Sentiment analysis in your own PDF documents with ChatGPT
While preparing some documents for a forthcoming academic review, I was asked by my department chair to go through all of the student comments from every course I've taught in the last 6 years and find a few "positive" comments that he could quote in his summary writeup.
As I usually teach 3 courses per year, sometimes with cross-listings in multiple departments and/or undergrad/grad sections. All in, this resulted in 32 PDF documents each with many student comments that I needed to draw from. Doing it manually, would require opening each document, reading and/or compiling the comments and then evaluating and choosing the "most positive" comments. I decided to use ChatGPT with a text embedding to assit me in this task, and thought the code might be useful to others so I am sharing it below along with some comments and documentation.
First we start with the package imports. I'm heavily using langchian which provides abstractions for using large language models (LLMs) and tooling to easily "chain together" tasks such as reading in text, creating a vectorstore of the text embedding to be passed to a LLM along with a prompt which a specific question or instruction.
import os
from PyPDF2 import PdfReader
from langchain.text_splitter import CharacterTextSplitter
from langchain.embeddings import OpenAIEmbeddings
from langchain.vectorstores import FAISS
from langchain.memory import ConversationBufferMemory
from langchain.chains import ConversationalRetrievalChain
from langchain.chat_models import ChatOpenAI
from langchain.prompts import ChatPromptTemplate
from langchain.prompts.chat import SystemMessage, HumanMessagePromptTemplate

from IPython.display import display, Markdown
We're going to use ChatGPT from OpenAI so we'll need to supply an API key. This video tutorial demonstrates how to aquire an API key. If you'd like to use the code below, you'll need to uncomment and paste your API key in the string to the right of the equals sign below.
#os.environ['OPENAI_API_KEY'] = "<your API key here>"
Now we'll define a few helper functions to help us find PDFs in a given directory and then parse the text out of them. The get_pdf_text function below combines all the text from all the PDFs into a single text string.
def find_pdf_files(directory_path):
    pdf_files = []
    for root, dirs, files in os.walk(directory_path):
        for file in files:
            if file.endswith('.pdf'):
                pdf_files.append(file)
    return pdf_files

def get_pdf_text(pdf_files):
    text = ""
    for pdf in pdf_files:
        pdf_reader = PdfReader(pdf)
        for page in pdf_reader.pages:
            text += page.extract_text()
    return text
Next we'll use the CharacterTextSpitter class from langchain to take the continuous string of text from all the PDFs and turn them into chunks of texts which is needed to create a vectorstore text embedding. Text ebeddings measure the relatedness of text strings.
def get_text_chunks(raw_text):
    text_splitter = CharacterTextSplitter(
        separator = '\n',
        chunk_size = 2000,
        chunk_overlap = 500,
        length_function = len
    )
    chunks = text_splitter.split_text(raw_text)
    return chunks
Here we create the vectorstore using the OpenAIEmbeddings class. While we are using an OpenAI embedding here, it's not required. Langchain provides nice abstractions that allow for using different embeddings model with ChatGPT.
def get_vectorstore(chunks):
    embeddings = OpenAIEmbeddings()
    vectorstore = FAISS.from_texts(texts=chunks, embedding=embeddings)
    return vectorstore
Below we create the converstation chiain which combines a prompt template with the text embedding and allows for users querys. Prompt templates can increase the accuracy of LMM responses. Special thanks to Jeremy Howard and his Twitter thread from which I took his custom instructions as a system prompt template.
def get_conversation_chain(vectorstore):
    template = ChatPromptTemplate.from_messages(
      [
        SystemMessage(
            content=(
                "You are an autoregressive language model that has been fine-"
                "tuned with instruction-tuning and RLHF. You carefully "
                "provide accurate, factual, thoughtful, nuanced answers, and"
                "are brilliant at reasoning. If you think there might not be "
                "a correct answer, you say so. Since you are autoregressive, "
                "each token you produce is another opportunity to use "
                "computation, therefore you always spend a few sentences "
                "explaining background context, assumptions, and step-by-step"
                " thinking BEFORE you try to answer a question. Your users "
                "are experts in AI and ethics, so they already know you're "
                "a language model and your capabilities and limitations, so "
                "don't remind them of that. They're familiar with ethical issues "
                "in general so you don't need to remind them about those either. "
                "Don't be verbose in your answers, but do provide details and "
                "examples where it might help the explanation."
            )
        ),
        HumanMessagePromptTemplate.from_template("{text}"),
      ]
    )
    llm = ChatOpenAI()#model_name="gpt-4")
    memory = ConversationBufferMemory(memory_key='chat_history', return_messages=True)
    conversation_chain = ConversationalRetrievalChain.from_llm(
        llm=llm,
        condense_question_prompt=template,
        retriever=vectorstore.as_retriever(),
        memory=memory
    )
    return conversation_chain
Finally, the function below combines all the helper functions and returns a chat chain that we can ask questions based on the content contained in our PDFs.
def create_chat_from_pdfs(directory):
    pdfs = find_pdf_files(directory)
    raw_text = get_pdf_text(pdfs)
    chunks = get_text_chunks(raw_text)
    vs = get_vectorstore(chunks)
    chain = get_conversation_chain(vs)
    return chain
Here we initialize the chain to read in any PDFs in the current working directory.
chat_chain = create_chat_from_pdfs(".")
Now we use the chain and our custom text embedding to find 15 of the "most postive and supportive" student comments giving preference to those that use the phrase "Dr. Foster". Finally we print out the results of the query using Markdown to format the list in rich text.
result = chat_chain.run("In the given text, there are many student comments "
                        "preceeded with the word RESPONSE in capital letters. "
                        "Choose 15 of the most positive and supportive "
                        "student comments for the instructor and course. "
                        "Give preference to the comments that call out "
                        "Dr. Foster by name")
display(Markdown(result))
While you don't have access to the original PDFs, I can assure you that these comments have been parsed from them and quite responsive to the prompt I used. They are not all "perfectly" responsive, but I really only need 2-3 comments, so I asked for 15 so that I can then inspect them to downselect and choose the ones I'd like to provide.
You should be able to adapt this code to your own use cases.
What I might have done in a recent hackathon
and why domain expertise matters in machine learning...
Recently, my colleague Prof. Michael Pyrcz (@GeostatsGuy) and myself hosted a data science hackathon open to students at The University of Texas at Austin with support from The Hildebrand Department of Petroleum and Geosystems Engineering. Given the COVID pandemic, we hosted the event virtually over two weekends in April 2021. The first weekend consisted of a workshop followed by an explanation of the problem dataset, then the students broke into teams and worked on their solutions that were ultimately submitted for scoring, code review, and presentation judging by a panel of industry experts the following weekend.
This was a really fun experience for me personally and the feedback has been incredible from all involved. Given that I have been teaching data science skills and challenging students in my classes with difficult coding exercises for years, it was great to see them showcase their capabilities.
I'd encourage you to take a look at the detailed problem statement and datasets linked to above, but briefly, the challenge was: given petrophysical data from well logs and spatial maps interpreted from seismic on 73 oil wells that have been in production for some time, predict the cumulative 3 year production for 10 new wells recently drilled, and having well log data, but not yet put into production. In addition to their "best estimate" the students where asked to provide 100 additional realizations such that an uncertainty model could be evaluated. The objective scoring consisted of comparisons of the mean squared error with respect to their "best estimate" and the true 3 year production (which we know, but was withheld from the students) as well as a scoring of their uncertainty model with a "goodness measure" proposed by Deutsch (1996).
I thought it would be a fun exercise to consider what I might have done to complete this challenge myself. In the spirit of the hackathon, I'll limit my time working on the project to what I can accomplish in a single day. Of course, since I am already familiar with the dataset, I have a head start over the teams in the competition who generally spent a few hours just investigating the data the first day. But given my short timeline, I won't be training any complicated neural network architectures or really any complicated machine learning models at all. I want to see how I can use my domain expertise to engineer meaningful features to get an answer quickly. I also have a surprise in store with respect to how I handled the uncertainty model. So let's get started...
Feature Imputation
First, like all work in Python, I'll start with the module imports used during this work.
import pandas as pd
import seaborn as sns
import numpy as np
import matplotlib.pyplot as plt
from matplotlib import cm
from matplotlib import colors
from scipy.optimize import curve_fit
from sklearn.cluster import KMeans
from sklearn.neighbors import KNeighborsClassifier
from sklearn.model_selection import GridSearchCV, KFold
from sklearn.decomposition import PCA
from sklearn.preprocessing import (PolynomialFeatures, MaxAbsScaler,
                                   MinMaxScaler, StandardScaler, RobustScaler)
from sklearn.linear_model import LinearRegression, ElasticNet
from sklearn.tree import DecisionTreeRegressor
from sklearn.ensemble import BaggingRegressor
from sklearn.pipeline import Pipeline
from sklearn.metrics import mean_absolute_percentage_error
sns.set(rc={'text.usetex' : True})
And I'll read in the well log datasets from both the wells that have been in production as well as what we call the preproduction wells, i.e. those we are trying to predict the cumulative production for after 3 years.
production_wells_df = pd.read_csv('wellbore_data_producer_wells.csv',
                                  index_col='Well_ID')
preproduction_wells_df = pd.read_csv('wellbore_data_preproduction_well.csv',
                                     index_col='Well_ID')
Now we'll combine those two dataframes into a single dataframe.
wells_df = pd.concat([production_wells_df, preproduction_wells_df])
wells_df.head()
And inspect some overall statistics on the dataset.
wells_df.describe().T
We can see that there is quite a bit of missing data. Of particular concern is the large amount of missing permeabilities as this will be one of the strongest indicators of production. So our first task is going to be to impute the missing features, especially working toward a good model for permeability. To start, let's plot some of the provided map data. Here we are showing the spatial distributions of percentage facies in the reservoir. There is a fault in the reservoir which we only know the location of, but no other information. The white circles represent wells we have production for, the red circles are wells we are trying to predict production. The fault is indicated by the red line.
production_well_locations = \
    (production_wells_df[['X, m', 'Y, m']]
     .groupby(production_wells_df.index)
     .mean())
preproduction_well_locations = \
    (preproduction_wells_df[['X, m', 'Y, m']]
     .groupby(preproduction_wells_df.index)
     .mean())
px = production_well_locations['X, m'].to_numpy()[::1]
py = -production_well_locations['Y, m'].to_numpy() + 10000
ppx = preproduction_well_locations['X, m'].to_numpy()[::1]
ppy = -preproduction_well_locations['Y, m'].to_numpy() + 10000
fx = np.linspace(0, 1e4, num=5)
fy = fx - 1750
fig = plt.figure(constrained_layout=True, figsize=(8,5))
ax = fig.subplot_mosaic(
    [['sand',  'sandy shale', 'colorbar'],
     ['shale', 'shaly sand',  'colorbar']],
     gridspec_kw={"width_ratios": [1, 1, 0.1]})
cmap = cm.get_cmap('viridis', 100)
bounds = np.linspace(0,1.0,num=100)
vals = bounds#[:-1]
norm = colors.BoundaryNorm(bounds, cmap.N)
ax['sand'].imshow(np.load('2d_sand_propotion.npy'), cmap=cmap, norm=norm,
                  extent=[0, 10000, 0, 10000])
ax['sand'].scatter(px, py, color='w', marker='o', alpha=0.5)
ax['sand'].scatter(ppx, ppy, color='r', marker='o', alpha=0.5)
ax['sand'].plot(fx, fy, color='r')
ax['sand'].set_ylim([0,1e4])
ax['sand'].set_title('Sand')
ax['sand'].set_aspect(1)
ax['sand'].grid(None)
ax['sandy shale'].imshow(np.load('2d_sandy_shale_propotion.npy'), cmap=cmap,
                         norm=norm, extent=[0, 10000, 0, 10000])
ax['sandy shale'].scatter(px, py, color='w', marker='o', alpha=0.5)
ax['sandy shale'].scatter(ppx, ppy, color='r', marker='o', alpha=0.5)
ax['sandy shale'].plot(fx, fy, color='r')
ax['sandy shale'].set_ylim([0,1e4])
ax['sandy shale'].set_title('Sandy shale')
ax['sandy shale'].set_aspect(1)
ax['sandy shale'].grid(None)
ax['shale'].imshow(np.load('2d_shale_propotion.npy'), cmap=cmap, norm=norm,
                   extent=[0, 10000, 0, 10000])
ax['shale'].scatter(px, py, color='w', marker='o', alpha=0.5)
ax['shale'].scatter(ppx, ppy, color='r', marker='o', alpha=0.5)
ax['shale'].plot(fx, fy, color='r')
ax['shale'].set_ylim([0,1e4])
ax['shale'].set_title('Shale')
ax['shale'].set_aspect(1)
ax['shale'].grid(None)
im = ax['shaly sand'].imshow(np.load('2d_shaly_sand_propotion.npy'), cmap=cmap,
                             norm=norm, extent=[0, 10000, 0, 10000])
ax['shaly sand'].scatter(px, py, color='w', marker='o', alpha=0.5)
ax['shaly sand'].scatter(ppx, ppy, color='r', marker='o', alpha=0.5)
ax['shaly sand'].plot(fx, fy, color='r')
ax['shaly sand'].set_ylim([0,1e4])
ax['shaly sand'].set_title('Shaly sand')
ax['shaly sand'].set_aspect(1)
ax['shaly sand'].grid(None)
cbar = fig.colorbar(im, cax=ax['colorbar'], boundaries=bounds, values=vals);
cbar.set_ticks([0.0, 0.25, 0.5, 0.75, 1.0])
cbar.set_ticklabels([r'$0$', r'$\frac{1}{4}$', r'$\frac{1}{2}$',
                     r'$\frac{3}{4}$', r'$1$'])

It doesn't look like the fault produces any offset or discontinuity in the spatial facies information, that's good news, so we'll proceed with imputing the missing facies information using spatial location information. First, we'll subset the dataframe and replace the string labels for facies with numerical ones, so 0 will indicated Sandstone, 1 will indicate Sandy shale, and so on...
facies_df = (wells_df[['X, m', 'Y, m', 'Depth, m', 'Rock facies']]
             .replace({'Sandstone': 0,
                       'Sandy shale': 1,
                       'Shale': 2,
                       'Shaly sandstone': 3})
            )
missing_facies = facies_df['Rock facies'].isnull()
facies_df[~missing_facies].head()
Now we'll build a k-nearest neighbors classifier, do a little hyperparameter tuning with scikit-learn's builtin GridSearchCV.
parameters = {'weights': ('uniform', 'distance'),
              'n_neighbors':[4, 6, 8, 10]}
knn = KNeighborsClassifier()
gcv = GridSearchCV(knn, parameters, cv=KFold(random_state=2, shuffle=True))
gcv.fit(facies_df.loc[~missing_facies, 'X, m':'Depth, m'],
        facies_df.loc[~missing_facies, 'Rock facies'])
gcv.best_params_
Using the hyperparameter settings above, we can now predict (and impute) the missing facies values.
facies_df.loc[missing_facies, 'Rock facies'] = \
    gcv.predict(facies_df.loc[missing_facies, 'X, m':'Depth, m'])
wells_df['Rock facies'] = facies_df['Rock facies'].astype('int')
wells_df.describe().T.loc[['X, m', 'Y, m', 'Rock facies']]
Given that we'd expect rocks of the same facies to have a similar density and acoustic impedance, we'll impute those missing features with the averages from each facies.
wells_df['Density, g/cm3'] = \
    (wells_df.groupby('Rock facies')['Density, g/cm3']
             .apply(lambda df: df.fillna(df.mean()))
             .reset_index()
             .set_index(['Well_ID'])
    )

wells_df['Acoustic Impedance, kg/s-m^2'] = \
    (wells_df.groupby('Rock facies')['Acoustic Impedance, kg/s-m^2']
             .apply(lambda df: df.fillna(df.mean()))
             .reset_index()
             .set_index(['Well_ID'])
    )
Now we'll subset the dataframe and use the features shown to impute the missing porosity values using polynomial regression.
missing_porosity = wells_df['Porosity, fraction'].isnull()
porosity_df = (wells_df.loc[:, 'X, m':'Density, g/cm3']
               .drop('Permeability, mD', axis=1))
porosity_df.head()
We'll setup a pipeline and use GridSearchCV again to find the best hyperparameters.
scalers = [MaxAbsScaler(), MinMaxScaler(), StandardScaler(), RobustScaler()]

pipe = Pipeline([
    ('scaler', StandardScaler()),
    ('pca', PCA()),
    ('poly', PolynomialFeatures()),
    ('reg', LinearRegression())
])

params = {
    'scaler': scalers,
    'poly__degree': [1, 2, 3],
    'pca__n_components': [1, 2, 3, 4, 5, 6],
}

gcv = GridSearchCV(pipe, params, cv=KFold(random_state=5, shuffle=True))
gcv.fit(porosity_df[~missing_porosity].drop('Porosity, fraction', axis=1),
        porosity_df.loc[~missing_porosity, 'Porosity, fraction'])
gcv.best_params_
The best parameters are shown above. Now we'll use this model to impute the missing porosity.
porosity_df.loc[missing_porosity, 'Porosity, fraction'] = \
    gcv.predict(porosity_df[missing_porosity].drop('Porosity, fraction', axis=1))
Below we'll plot the imputed and given porosities. Nothing looks too strange here, none of the imputed values are outliers with respect to the ranges of the given data.
fig, ax = plt.subplots()
ax.scatter(porosity_df[~missing_porosity &
                       (porosity_df['Rock facies'] == 0)]['Depth, m'],
           porosity_df[~missing_porosity &
                       (porosity_df['Rock facies'] == 0)]['Porosity, fraction'],
           color='r', facecolors='none', label='Sandstone')
ax.scatter(porosity_df[missing_porosity &
                       (porosity_df['Rock facies'] == 0)]['Depth, m'],
           porosity_df[missing_porosity &
                       (porosity_df['Rock facies'] == 0)]['Porosity, fraction'],
           color='r', label='Sandstone (Imputed)')
ax.scatter(porosity_df[~missing_porosity &
                       (porosity_df['Rock facies'] == 1)]['Depth, m'],
           porosity_df[~missing_porosity &
                       (porosity_df['Rock facies'] == 1)]['Porosity, fraction'],
           color='b', facecolors='none', label='Sandy shale')
ax.scatter(porosity_df[missing_porosity &
                       (porosity_df['Rock facies'] == 1)]['Depth, m'],
           porosity_df[missing_porosity &
                       (porosity_df['Rock facies'] == 1)]['Porosity, fraction'],
           color='b', label='Sandy shale (Imputed)')
ax.scatter(porosity_df[~missing_porosity &
                       (porosity_df['Rock facies'] == 2)]['Depth, m'],
           porosity_df[~missing_porosity &
                       (porosity_df['Rock facies'] == 2)]['Porosity, fraction'],
           color='g', facecolors='none', label='Shale')
ax.scatter(porosity_df[missing_porosity &
                       (porosity_df['Rock facies'] == 2)]['Depth, m'],
           porosity_df[missing_porosity &
                       (porosity_df['Rock facies'] == 2)]['Porosity, fraction'],
           color='g', label='Shale (Imputed)')
ax.scatter(porosity_df[~missing_porosity &
                       (porosity_df['Rock facies'] == 3)]['Depth, m'],
           porosity_df[~missing_porosity &
                       (porosity_df['Rock facies'] == 3)]['Porosity, fraction'],
           color='k', facecolors='none', label='Shaly sand')
ax.scatter(porosity_df[missing_porosity &
                       (porosity_df['Rock facies'] == 3)]['Depth, m'],
           porosity_df[missing_porosity &
                       (porosity_df['Rock facies'] == 3)]['Porosity, fraction'],
           color='k', label='Shaly sand (Imputed)')
ax.set_xlabel('Depth, m')
ax.set_ylabel('Porosity, fraction')
ax.legend(bbox_to_anchor=(1.5, 1), loc='upper right', ncol=1);

We can also look at the distribution of the imputed porosities and compare to the given values. The imputation preserves the bimodal distribution of the original data.
fig, ax = plt.subplots(1, 2)
sns.distplot(porosity_df.loc[~missing_porosity, 'Porosity, fraction'], ax=ax[0])
ax[0].set_title('Given values')
sns.distplot(porosity_df.loc[missing_porosity, 'Porosity, fraction'], ax=ax[1]);
sns.distplot(porosity_df.loc[missing_porosity, 'Porosity, fraction'], ax=ax[1]);
ax[1].set_title('Imputed values');

Now we'll add this imputed data to our wells_df.
wells_df['Porosity, fraction'] = porosity_df['Porosity, fraction']
To impute the missing permeabilities, we'll use some knowledge of petrophysics to do a little feature engineering. There is a widely used correlation between porosity and permeability called the Kozeny-Carmen relationship which models permeability as
$$ \kappa \sim \frac{\phi^3}{(1-\phi)^2} $$
where $\kappa$ is the permeability and $\phi$ is the porosity. We can quickly take a look at this relationship using seaborn's builtin regplot function, i.e.
missing_perms = wells_df['Permeability, mD'].isnull()
ϕ = wells_df.loc[~missing_perms, 'Porosity, fraction'].to_numpy()
fig, ax = plt.subplots()
sns.regplot(ϕ ** 3 / (1 - ϕ) ** 2,
            wells_df.loc[~missing_perms, 'Permeability, mD'], ax=ax);
ax.set_xlabel(r'$\frac{\phi^3}{(1 - \phi)^2}$');

While not the best model, we can use this data to condition our more complex prediction to come. First we find the slope and intercept of the blue line above.
fphi = lambda ϕ, m, kappa0: m * ϕ ** 3 / (1 - ϕ) ** 2 + kappa0
popt, _ = curve_fit(fphi, ϕ, wells_df.loc[~missing_perms, 'Permeability, mD'])
Now we'll use the model to create a feature we'll call 'KC permeability, mD'.
perm_df = wells_df.loc[:, 'X, m':'Density, g/cm3']
perm_df['KC permeability, mD'] = fphi(wells_df['Porosity, fraction'],
                                      popt[0], popt[1])
Using the data show above, we'll build a model to impute the missing permeabilities. Again, using GridSearchCV to hyperparameter tune, we have
scalers = [MaxAbsScaler(), MinMaxScaler(), StandardScaler(), RobustScaler()]

pipe = Pipeline([
    ('scaler', StandardScaler()),
    ('pca', PCA()),
    ('poly', PolynomialFeatures()),
    ('reg', LinearRegression())
])

params = {
    'scaler': scalers,
    'poly__degree': [2, 3, 4],
    'pca__n_components': [1, 2, 3, 4, 5, 6, 7],
}

gcv = GridSearchCV(pipe, params, cv=KFold(random_state=5, shuffle=True))
gcv.fit(perm_df[~missing_perms].drop('Permeability, mD', axis=1),
        perm_df.loc[~missing_perms, 'Permeability, mD'])
gcv.best_params_
With these parameters, we can predict the missing permeabilities.
perm_df.loc[missing_perms, 'Permeability, mD'] = \
    gcv.predict(perm_df[missing_perms].drop('Permeability, mD', axis=1))
Visualizing the results of the prediction against the given data, this model appears to perform well.
fig, ax = plt.subplots()
ax.scatter(perm_df[~missing_perms &
                   (perm_df['Rock facies'] == 0)]['Porosity, fraction'],
           perm_df[~missing_perms &
                   (perm_df['Rock facies'] == 0)]['Permeability, mD'],
           color='r', facecolors='none', label='Sandstone')
ax.scatter(perm_df[missing_perms &
                   (perm_df['Rock facies'] == 0)]['Porosity, fraction'],
           perm_df[missing_perms &
                   (perm_df['Rock facies'] == 0)]['Permeability, mD'],
           color='r', label='Sandstone (Imputed)')
ax.scatter(perm_df[~missing_perms &
                   (perm_df['Rock facies'] == 1)]['Porosity, fraction'],
           perm_df[~missing_perms &
                   (perm_df['Rock facies'] == 1)]['Permeability, mD'],
           color='b', facecolors='none', label='Sandy shale')
ax.scatter(perm_df[missing_perms &
                   (perm_df['Rock facies'] == 1)]['Porosity, fraction'],
           perm_df[missing_perms &
                   (perm_df['Rock facies'] == 1)]['Permeability, mD'],
           color='b', label='Sandy shale (Imputed)')
ax.scatter(perm_df[~missing_perms &
                   (perm_df['Rock facies'] == 2)]['Porosity, fraction'],
           perm_df[~missing_perms &
                   (perm_df['Rock facies'] == 2)]['Permeability, mD'],
           color='g', facecolors='none', label='Shale')
ax.scatter(perm_df[missing_perms &
                   (perm_df['Rock facies'] == 2)]['Porosity, fraction'],
           perm_df[missing_perms &
                   (perm_df['Rock facies'] == 2)]['Permeability, mD'],
           color='g', label='Shale (Imputed)')
ax.scatter(perm_df[~missing_perms &
                   (perm_df['Rock facies'] == 3)]['Porosity, fraction'],
           perm_df[~missing_perms &
                   (perm_df['Rock facies'] == 3)]['Permeability, mD'],
           color='k', facecolors='none', label='Shaly sand')
ax.scatter(perm_df[missing_perms &
                   (perm_df['Rock facies'] == 3)]['Porosity, fraction'],
           perm_df[missing_perms &
                   (perm_df['Rock facies'] == 3)]['Permeability, mD'],
           color='k', label='Shaly sand (Imputed)')
ax.set_xlabel('Porosity, fraction')
ax.set_ylabel('Permeability, mD')
ax.legend(bbox_to_anchor=(1.5, 1), loc='upper right', ncol=1);

The 'KC permeability, mD' is redundant now, so we'll drop it from the dataframe.
perm_df.drop('KC permeability, mD', axis=1, inplace=True)
Feature engineering
Since the fault runs right through both the produced wells and the wells we are trying to predict production for, let's engineer a few features related to the fault. First we'll engineer a feature we'll call 'Distance to fault' which computes the perpendicular distance to the fault. Also, we don't know if the fault compartmentalizes the reservoir in any way, so we'll also create a feature called 'left/right fault' to indicate which side of the fault a well lies.
perm_df['Distance to fault'] = np.sqrt((perm_df['X, m'] + perm_df['Y, m'] - 11750) ** 2) / np.sqrt(2)
perm_df['left/right fault'] = np.sign(perm_df['X, m'] * (-11750) - (perm_df['Y, m'] - 11750) * (11750))
Because all of the prediction wells are "near" the fault, we'll create another boolean feature that gives some importance to wells near the fault. We'll define "near" as any well that is closer than the mean preproduction (i.e. prediction) well distance from the fault.
preproduction_wells = perm_df.index.isin(preproduction_wells_df
                                         .index.to_numpy())
max_distance = perm_df.loc[preproduction_wells, 'Distance to fault'].mean()
perm_df['close to fault'] = np.where(
    perm_df['Distance to fault'] < max_distance, 1, 0)
Give that we anticipate wells that are "similar" to have "similar" production, we'll use KMeans clustering to find similar wells in our dataframe
scalers = [MaxAbsScaler(), MinMaxScaler(), StandardScaler(), RobustScaler()]

pipe = Pipeline([
    ('scaler', StandardScaler()),
    ('cluster', KMeans())
])

params = {
    'scaler': scalers,
    'cluster__n_clusters': [10, 12, 14],
}

gcv = GridSearchCV(pipe, params, cv=KFold(random_state=3, shuffle=True))
gcv.fit(perm_df.loc[~preproduction_wells])
gcv.best_params_
And use the model to predict which cluster the preproduction wells would fall into.
perm_df['Cluster'] = gcv.predict(perm_df)
Now we'll read in the production histories and merge them with our working dataframe.
production_history_df = pd.read_csv('production_history.csv',
                                    index_col='Well_ID')
production_df = perm_df.merge(production_history_df,
                              how='left',
                              left_index=True,
                              right_index=True)
production_df.head()
Now we'll compute the average 1, 2, and 3 year productions for each cluster and assign a new feature with this average value as the expected average production at each well location.
avg_production_df = (production_df
                     .groupby('Cluster')
                     .mean()
                     .loc[:, 'Cumulative oil production (1 yr), MSTB' \
                            :'Cumulative Water production (3 yr), MSTB']
                     .reset_index()
                     .rename(columns={'Cumulative oil production (1 yr), ' \
                                      'MSTB':'Avg. oil prod (1 yr)',
                                      'Cumulative oil production (2 yr), ' \
                                      'MSTB':'Avg. oil prod (2 yr)',
                                      'Cumulative oil production (3 yr), ' \
                                      'MSTB':'Avg. oil prod (3 yr)',
                                      'Cumulative Water production (1 yr), ' \
                                      'MSTB':'Avg. water prod (1 yr)',
                                      'Cumulative Water production (2 yr), ' \
                                      'MSTB':'Avg. water prod (2 yr)',
                                      'Cumulative Water production (3 yr), ' \
                                      'MSTB':'Avg. water prod (3 yr)'})
                    )
Merging these averaged production values into our working dataframe, we have the final dataframe which we'll use to make predictions with.
final_df = (production_df
            .reset_index()
            .merge(avg_production_df,
                   how='left',
                   on='Cluster')
            .set_index(['Well_ID'])
           )
final_df.head()
Predictions
In order to hyperparameter tune our forthcoming models, we're going to use the "goodness" measure of Deutsch, 1996, i.e.
$$ \mbox{goodness} = 1 - \int_0^1 \left(2 a(p) - 2 \right) \left(\overline{\xi(p)} - p \right) \mathrm{d}p $$
in addition to the mean_absolute_percentage_error from scikit-learn to score our models. The idea will be to use the BaggingRegressor to create an ensemble of models that we average over to create our "best estimate" as well using each individual estimator as a realization for our uncertainty model. We'll score our model over each fold in the cross-validation using GridSearchCV. Credit goes to Honggeun Jo for creating the original version of this function which I only slightly modified here.
def goodness_score(y_true, y_realizations):

    goodness_score_array = []
    # Define upper/lower boundary of "within-percentile" ranges
    list_percentile_lower = 50 - 5 * np.arange(0, 11, dtype=np.int32)
    list_percentile_upper = 50 + 5 * np.arange(0, 11, dtype=np.int32)

    for i in range(11):     # 0%, 10%, 20%, 30%, ... 100% percentiles ranges
        num_within = 0      # Counts for predictions within the range
        for (j, realization) in enumerate(y_realizations.T):
            min_ = np.percentile(realization, list_percentile_lower[i])
            max_ = np.percentile(realization, list_percentile_upper[i])
            if y_true[j] > min_ and y_true[j] < max_:
                num_within += 1
        goodness_score_array.append(num_within)

    goodness_score_upNdown = (np.array(goodness_score_array) -
                              np.arange(0,11, dtype=np.double))
    a_interval_index = [1 if goodness_score_array[i+1] >= i+1
                        else 0 for i in range(10)]
    goodness_score_ = 1
    for i in range(10):
        if a_interval_index[i] == 1:
            goodness_score_ -= 0.5 * goodness_score_upNdown[i+1] / 45
        else:
            goodness_score_ -= -goodness_score_upNdown[i+1] / 55
    return np.abs(goodness_score_)


def scorer(estimator, X, y):
    mape = 1 - mean_absolute_percentage_error(y[:,-1], estimator.predict(X)[:, -1])

    pipe = estimator[:-1]
    Xt = pipe.transform(X)

    realizations = []
    features = estimator[-1].estimators_features_
    for (i, e) in enumerate(estimator[-1].estimators_):
        realizations.append(e.predict(Xt[:, features[i]])[:, -1])
    realizations = np.array(realizations)

    goodness = goodness_score(y[:,-1], realizations)

    return 0.5 * mape + 0.5 * goodness
Separating our predictor and response features labels.
response_features = ['Cumulative Water production (1 yr), MSTB',
                     'Cumulative Water production (2 yr), MSTB',
                     'Cumulative Water production (3 yr), MSTB',
                     'Cumulative oil production (1 yr), MSTB',
                     'Cumulative oil production (2 yr), MSTB',
                     'Cumulative oil production (3 yr), MSTB']
predictor_features = final_df.columns[~final_df.columns
                                      .isin(response_features)].to_numpy()
Since there are several data samples from each well, but we are only asked to report our prediction for the entire well, there are several options on how to proceed. This simplest is just to average all the samples over each well, we'll use this approach in the interest of time.
avg_final_df = final_df.groupby(final_df.index).mean()
Getting a boolean indexer for our training wells (the wells that have been in production).
train_wells = ~avg_final_df.index.isin(preproduction_wells_df.index)
Now we'll set up a pipeline and pass that to GridSearchCV for hyperparameter tuning. I iterated this a few times to narrow down the final set of parameters to search, so that the final notebook/solution runs in a timely manner. Here I'm using 7 folds in the k-fold cross-validation because that leaves about 10 wells in the test set, similar to the number we need to predict.
scalers = [MaxAbsScaler(), RobustScaler()]

pipe = Pipeline([
    ('scaler', StandardScaler()),
    ('pca', PCA()),
    ('poly', PolynomialFeatures()),
    ('bag', BaggingRegressor(base_estimator=LinearRegression(),
                             n_estimators=100, n_jobs=-1, random_state=7)),
])

params = [{
    'scaler': scalers,
    'pca__n_components': [8, 9],
    'poly__degree': [1, 2],
    'bag__max_samples': [0.75, 1.0],
    'bag__max_features': [0.75, 1.0],
    'bag__bootstrap': [True, False],
    'bag__base_estimator': [LinearRegression()]
}]

gcv = GridSearchCV(pipe, params, scoring=scorer,
                   cv=KFold(n_splits=7, shuffle=True, random_state=17)
)

gcv.fit(avg_final_df.loc[train_wells, predictor_features].to_numpy(),
        avg_final_df.loc[train_wells, response_features].to_numpy())
print(gcv.best_score_)
gcv.best_params_
The "best score" and final set of hyperparameters are shown above. Now we'll write our best estimate and realizations to the solution file.
solution_df = pd.read_csv('solution.csv', index_col='Well_ID')
pipe = gcv.best_estimator_

#best estimate
solution_df['Prediction, MSTB'] = \
    pipe.predict(avg_final_df.loc[~train_wells, predictor_features])[:, -1]

#realizations
Xt = pipe[:-1].transform(avg_final_df.loc[~train_wells, predictor_features])

features = pipe[-1].estimators_features_
for (i, estimator) in enumerate(pipe[-1].estimators_):
    pt = estimator.predict(Xt[:, features[i]])[:, -1]
    solution_df[f'R{i+1}, MSTB']  = pt

#write to file
solution_df.to_csv('solution.csv')
Submitting the solution file for scoring, we can generate the following plots. First we have the accuracy plot which compares the predictions to the actual 3 yr. production for the 10 wells.
from score import (create_accuracy_plot_and_return_mse,
                   create_realizations_plots,
                   create_goodness_plot_and_return_goodness_score)

truth_data = np.load('True_for_predrill_3yr.npy')

mse = create_accuracy_plot_and_return_mse(solution_df, truth_data);
print(f'MSE: {mse}')

Below the uncertainty models are shown along with the true values.
create_realizations_plots(solution_df, truth_data)

And finally the goodness plot. The goodness measure we used in our scorer function above is related to the integral of the black dashed line with respect to the diagonal red line where the area below above the red line is weighted twice the area below.
goodness = create_goodness_plot_and_return_goodness_score(solution_df,
                                                          truth_data);
print(f'Goodness: {goodness}')

Finally, my rank in the competition among the other teams (note, this is only for the objective part of the scoring, in the actual Hackathon, there we had additional columns for code quality and presentations, therefore the final rankings of the other teams in this table does not reflect the actual final outcome of the competition). Not bad for a days work!
from IPython.display import Image
Image('results_table.png', width=500)

The final message here is that domain expertise, which leads to good imputation and feature engineering strategies is far more useful than fancy machine learning models. Additionally, understanding exactly the quantities of interest you are looking for so that you evaluate (i.e. score) your models well. In the end, I "won" the competition with a linear regression model.
JAX implementation of FEA and efficient inverse problem solving with neural networks
If you haven't heard by now JAX is getting a lot of attention online as a "NumPy on steroids". At it's core, it can be thought of as a drop-in replacement for NumPy where the array calculations can be accelerated on GPUs or TPUs when available. This alone makes it worth looking at, especially if you have a lot of NumPy code that you would like to potentially speed up with GPU acceleration. Currently, most of the NumPy API is implemented in one-to-one correspondence, as well of some of the most used functions in SciPy.
The accelerated NumPy is just the beginning of the utility of JAX. All of the JAX NumPy data structures can be used in combination with most pure Python code to create functions which can be automatically differentiated. This includes computing the gradient of scalar functions, as well as Jacobian matrices of vector functions. These operations can be composed to compute gradients-of-gradients, etc. More information of the automatic differentiation capabilities are documented here.
Additionally, there is a built-in just-in-time compiler for compiling functions to be executed on CPUs/GPUs/TPUs, and support for automatic vectorization, i.e. functions written for scalar arguments can be easily mapped across arrays. These can be used with the automatic differentiation functions previously mentioned.
Finally, there is a very thin neural network library associated with JAX called stax. Other, more fully-featured libraries like Haiku, Flax, or Trax are under development on top of JAX technologies.
In what follows, I'll highlight most of these features of JAX by implementing a finite element analysis (FEA) model and then using the finite element residual as part of the objective function when training a neural network in an inverse solution to a potentially unknown constitutive model.
Problem definition
As a model problem, we'll start with the one-dimensional pressure diffusivity equation which governs single phase fluid flow in a porous media with fluid density $\rho$ and small compressibility $c$.
$$ \rho c \frac{\partial p}{\partial t} = \frac{\partial}{\partial x}\left(\frac{\kappa}{\mu} \frac{\partial p}{\partial x}\right) $$
Assuming steady state, multiplying by a test function $\delta p$ on the left and integrating by parts over the domain $(0, L)$ we have
\begin{align} 0 =& \int_0^L \lambda(x) \frac{\partial \left(\delta p\right)}{\partial x} \frac{\partial p}{\partial x} \textrm{d}x - \left[ \lambda(x) \delta p \frac{\partial p}{\partial x} \right]_0^L \\ =& \int_0^L \lambda(x) \frac{\partial \left(\delta p\right)}{\partial x} \frac{\partial p}{\partial x} \textrm{d}x - \left[ q \right]_0^L \end{align}
where
$$ \lambda(x) = \frac{\kappa}{\mu}, $$
$\kappa$ is the porous medium's permeability and $\mu$ is the fluid viscosity. $\lambda$ is known as the mobility and is assumed to be spatially varying.
Using a Galerkin appoximation, i.e. $p = N_J p_J$ and $\delta p = N_I$ for $I,J = 1, 2, \ldots$ basis functions and splitting the domain into $n$ intervals, we now have
\begin{align} 0 =& \sum_{k=0}^n p_J \left(\int_{x_k}^{x_{k+1}} \lambda(x) \frac{\partial N_I}{\partial x} \frac{\partial N_J}{\partial x} \textrm{d}x - \left[ q \right]_{x_k}^{x_{k+1}} \right) \end{align}
where summation over the $J$ basis functions are implied for those that have support on the $I^{th}$ node. The right-hand side above is our residual, i.e. $\vec{R}$
\begin{align} R_I \equiv \sum_{k=0}^n p_J \left(\int_{x_k}^{x_{k+1}} \lambda(x) \frac{\partial N_I}{\partial x} \frac{\partial N_J}{\partial x} \textrm{d}x - \left[ q \right]_{x_k}^{x_{k+1}} \right) \end{align}
below, we'll integrate this residual vector using Gauss integration and solve for the unknown nodal pressures $p_J$. Without loss of generality we'll only consider Dirchelet boundary conditions, i.e. $q(x) = 0$.
While this model problem is linear, we'll implement the FEA model to use the residual form of the equations, and solve for the unknowns using a nonlinear Newton-Raphson solver where the Jacobian matrix at each iteration is computed via automatic-differentiation with JAX. All of the computations are written in a way that they could be accelerated on GPUs/TPUs and are just-in-time compiled.
FEA implementation
Below are the imports we need, note that we explicitly enable 64-bit floating point numbers for JAX as 32-bit is the default.
from functools import partial, partialmethod

import numpy as np
import matplotlib.pyplot as plt

from jax import jit, vmap, value_and_grad, random, flatten_util
import jax.numpy as jnp
import jax.scipy.optimize
import jax.ops
from jax.config import config
config.update("jax_enable_x64", True)
class FEAProblem():


    def __init__(self, nodes, mobility=lambda x: 1, left_bc=1.0, right_bc=-1.0):
        """FEAProblem class

        Args:

            nodes (array-like): nodal spatial locations of unknowns
            mobility (callable): function defining the mobility function
                                 in space
            left_bc (real): Dirchelet boundary on the left of the domain
            right_bc (real): Dirchelet boundary on the right of the domain
        """


        self.nodes = jnp.array(nodes, dtype='float64')
        self.connect = jnp.array([ jnp.arange(i,i+2)
                                   for i in range(self.nodes.shape[0] - 1)])
        self.__lbc = left_bc
        self.__rbc = right_bc
        self.mobility = mobility

        return


    def setup_element_matrices(self):
        """Integrates the element stiffness matrices for linear basis functions
           with 2 points Guass integration
        """

        nodes = self.nodes

        #We will use Gauss integration at the following points
        t1 =  np.sqrt(1.0 / 3.0)
        t2 = -np.sqrt(1.0 / 3.0)

        # Because the points above are defined on the domain -1 < x < 1 and our
        # elements are defined on arbitrary domains, we can use a change of
        # variables to rescale the integration bounds
        ξ1 = ((nodes[1:] - nodes[:-1]) * t1 + nodes[1:] + nodes[:-1]) / 2.0
        ξ2 = ((nodes[1:] - nodes[:-1]) * t2 + nodes[1:] + nodes[:-1]) / 2.0

        # Compute the function 𝜆, at the integration points
        𝜆ξ1 = self.mobility(ξ1)
        𝜆ξ2 = self.mobility(ξ2)

        # Since the derivatives of the shape functions are not dependent on ξ,
        # we can # create an array containing all of the element stiffness
        # matrices at once
        dNdξ = jnp.array([1 / (nodes[:-1] - nodes[1:]),
                          1 / (nodes[1:] - nodes[:-1])])
        # Computes the matrix dN_i * dN_j for every element (each will be
        # identical for equally spaced nodes)
        ke_temp = jnp.einsum('i...,j...', dNdξ, dNdξ)

        # Now we perform the Gauss integration computing the integrand for each
        # element
        temp = (nodes[1:] - nodes[:-1]) / 2 * (𝜆ξ1 + 𝜆ξ2)

        # We have to add two axis so the broadcasting is performed correctly,
        # the result here is the fully integrated element matrix array
        self.ke = temp[:, None, None] * ke_temp

        return


    @partial(jit, static_argnums=(0,))
    def residual(self, p):
        """Compute the FE residual vector

        Args:
            p (array-like): possible solution to residual equations

        Returns:
            (array-like): the residual vector
        """

        nodes = self.nodes
        connect = self.connect
        ke = self.ke

        # Initialize the residual
        res = jnp.zeros_like(nodes)

        # Compute the residual, i.e. sum all of the element
        # matrices with the nodal values, p
        res_temp = jnp.einsum('...ij, ...j', ke, p[connect]).flatten()

        # This is the JAX equivalent of
        # res[-1:1] = ...,  i.e. in place assignment
        res = res.at[1:-1].set(res_temp[1:-1].reshape(-1, 2).sum(axis=1))
        # Fix the residual values at the boundaries
        res = res.at[0].set(p[0] - self.__lbc)
        res = res.at[-1].set(p[-1] - self.__rbc)

        return res


    @partial(jit, static_argnums=(0,))
    def loss(self, p):
        """Compute the loss function, i.e. the
           l2 norm of the residual vector.

        Args:
            p (array-like): possible solution to the residual equations

        Returns:
            (real): discrete 2-norm of residual vector
        """
        return jnp.linalg.norm(self.residual(p))


    @partial(jit, static_argnums=(0,))
    def newton_step(self, p):
        """Compute one step of a Newton-Raphson iteration, uses
           JAX to compute the exact Jacobian via automatic differentiation

        Args:
            p (array-like): possible solution to the residual equations

        Returns:
            p (array-like): updated solution to the residual equations after
                          a single Newton-Raphson step
        """

        # The jacobian
        K = jax.jacfwd(self.residual)(p)

        # Compute the update direction
        Δp, _ = jax.scipy.sparse.linalg.gmres(lambda x: -K @ x,
                                              self.residual(p))

        # Update the unknowns and return
        p += Δp

        return p


    @partial(jit, static_argnums=(0,))
    def solve(self, tolerance=1.0e-4):
        """ Solve via Newton-Raphson iteration

        Args:
            tolerance (float): the tolerence at which the Newton-Raphson
                               iteration stops

        Returns:
            p (array-like): the converged solution to the residual equations
        """

        # Integrate the shape functions over each element
        self.setup_element_matrices()

        # Initial guess is linear between the boundary conditions
        p = jnp.linspace(self.__lbc, self.__rbc, num=self.nodes.shape[0])

        # The Newton-Raphson loop, can be compiled and automatically
        # differentiated
        p = jax.lax.while_loop(lambda x: self.loss(x) > tolerance,
                               self.newton_step, p)

        # Return the solution
        return p
Generate reference data
Below we'll solve the forward problem via FEA using the implementation above to verify things are working correctly as well as generate some reference data that we'll use in the inverse problem in the sequal. Here, the mobility function is
$$ \lambda(x) = x^3 + 0.001 $$
nodes = jnp.linspace(0, 1, num=20)
problem1 = FEAProblem(nodes, mobility = lambda x: x ** 3 + 0.001,
                      left_bc=15, right_bc=5)
p1 = problem1.solve(tolerance=1.0e-4)
fig, ax1 = plt.subplots()
ax2 = ax1.twinx()
ax1.plot(nodes, p1, 'k')
ax2.plot(nodes, nodes ** 3 + 0.001, 'r-.')
ax1.set_xlabel(r'$x$')
ax1.set_ylabel(r'$p(x)$', color='k');
ax2.set_ylabel(r'$\lambda(x)$', color='r');
ax2.tick_params(axis='y', colors='r')
ax2.spines['right'].set_color('r')

Inverse problem implementation
Here we will write our inverse problem solver. We will inherit from the FEAProblem class above so we can reuse some of the functions already defined.
Our objective function here will be the $l_2$-norm of the finite element residual when the "known data" is supplied as training data. Because the problem we are solving is a steady-state problem, we'll need to provide the endpoints of constitutive model to the objective function, otherwise there are infinite valid solutions to learning the constitutive model that only differ by a constant. If we extended this technique to time-dependent problems, I believe the need to provide the boundary constraints can be avoided.
We'll use a few functions from the jax.experimental.stax module, just to make the neural network construction easier. Our minimizer here will use the second-order "BFGS" method from jax.scipy.optimize.minimize.
Here we assume our data is supplied at the nodes of the FE model, but this restriction could be easily generalized by evaluating the residuals at any given spatial location via the FE shape functions.
from jax.experimental import stax
from jax.experimental.stax import Dense, Tanh
from jax.nn.initializers import glorot_normal, normal
class InverseProblem(FEAProblem):

    def __init__(self, nodes, mobility = stax.serial(Dense(1)),
                 mobility_left_bc=0.001, mobility_right_bc=1.001):
        """Class to solve for (i.e. learn) the constitutive model of
           the steady-state pressure diffusivity equation using a
           neural network (nn).

        Args:
            nodes (array-like): the spatial locations corresponding to the
                                data points
            mobility (stax.nn): a stax neural network definition
            mobility_left_bc (real): the left boundary value of the
                                     mobility function
            mobility_right_bc (real): the right boundary value of the
                                      mobility function
        """
        super().__init__(nodes, mobility = mobility)

        self.__mlbc = mobility_left_bc
        self.__mrbc = mobility_right_bc

        # unpack the functions to initialize and apply the network parameters
        net_init, self.net_apply = self.mobility

        # initialize the network parameters with random numbers
        seed = random.PRNGKey(10)
        _, net_params = net_init(seed, (-1, 1))

        # flatten the nn parameters into an single array
        self.initial_net_params_flat, self.unravel_pytree = flatten_util.ravel_pytree(net_params)

    @partial(jit, static_argnums=(0,))
    def residual(self, u, data):
        """Compute the FE residual vector

        Args:
            u (array-like): the unknown parameters of the nn
            data (array-like): the user supplied data (i.e. pressures)
                               at the nodes

        Returns:
            (array-like): residual vector
        """

        # Put the parameters back into the stax nn data structure
        net_params = self.unravel_pytree(u)

        # Set the mobility function to be the current nn
        self.mobility = lambda x: self._predict(x, net_params)
        mobility = self.mobility(self.nodes)

        # Integrate the element shape functions with the current
        # mobility function
        self.setup_element_matrices()

        # Return the FE residual vector with the supplied data
        return super().residual(data)

    @partial(jit, static_argnums=(0,))
    def loss(self, u, data):
        """Compute the squared error of the FE residual vector
           along with the mobility at the end points

        Args:
            u (array-like): the unknown parameters of the nn
            data (array-like): the user supplied data (i.e. pressures) at
                               the nodes

        Returns:
            (real): squared error of the FE residual and mobility function
                    end points
        """

        # Compute FE residual with supplied data
        residual = self.residual(u, data)

        # Put the unknowns back into the stax nn data structure
        net_params = self.unravel_pytree(u)

        # Use the nn parameters to compute the mobility at the nodes
        mobility = self._predict(nodes, net_params)

        # Compute squared error norm of mobility end points
        mobility_squared_error = ((mobility[0] - self.__mlbc) ** 2 +
                                  (mobility[-1] - self.__mrbc) ** 2)

        # Return FE + mobility squared error
        return jnp.linalg.norm(residual) ** 2 + mobility_squared_error

    def fit(self, data):
        """Fit the parameters of the neurual network representing the mobility
           function

        Args:
            data (array-like): known pressure data at the nodal locations
        """

        self.__lbc = data[0]
        self.__rbc = data[-1]

        u0 = self.initial_net_params_flat

        # minimize the loss function w.r.t. the uknown parameters of the nn
        u = jit(lambda u, data: jax.scipy.optimize.minimize(self.loss, u,
                                                            args=(data,),
                                                            method='BFGS').x)(u0, data)

        # assign the final nn params, such that we can use if for predicting
        self.net_params = self.unravel_pytree(u)

        return

    def _predict(self, x, params):
        """Used internal to the class only - evaluates the nn function
           at x with the given parameters
        """
        return vmap(partial(self.net_apply, params))(x).flatten()

    def predict(self, x):
        """Evaluates the nn function at x with the fit parameters

        Args:
            x (array-like): spatial locations to evalute the neural network
        """
        return self._predict(x, self.net_params)
Solve inverse problem using NN
Below we'll test out our inverse problem solver using the data generated earlier from the forward finite element solution. First we define our neural network architecture. This is a fairly simple function, so we don't need a large and/or complex neural network. Here we have an input layer with only 4 nodes and a $\tanh$ activation function feeding to a single node output. More complicated architectures also work, yielding the same result at more computational cost.
We also need to define the layer Dense64 which is the same as stax.Dense, but initialized to use 64-bit floats to be consistant with our data structures in the FEA residual calculation.
Dense64 = lambda x: Dense(x, W_init=glorot_normal(dtype='float64'),
                             b_init=normal(dtype='float64'))

nn = stax.serial(
    Dense64(4), Tanh,
    Dense64(1)
)
Now we instantiate the model and solve the inverse problem, i.e. train the network. We do have to supply the endpoints of the constitutive model. Given the problem is parabolic, there are infinite solutions to the inverse problem (they all have the same shape, but differ by a constant scale factor). We could remove this restriction by considering a time-dependent problem and supplying the time depended training data which we'll leave for future work.
iproblem1 = InverseProblem(nodes, mobility = nn,
                           mobility_left_bc = 0.001, mobility_right_bc = 1.001)
iproblem1.fit(p1)
Plotting the neural network function over the range of the domain and comparing with the reference, we can see that the inverse solver has "learned" the mobility function well.
x = nodes
fig, ax = plt.subplots()
ax.plot(x, x ** 3 + 0.001, 'k-')
ax.plot(x, iproblem1.predict(x), 'r-.')
ax.set_xlabel(r'$x$')
ax.set_ylabel(r'$\lambda(x)$');
ax.legend([r'$\lambda(x) = x^3 + 0.001$', r'$\lambda(x) = \mathcal{NN}(x)$']);

Use the trained NN in the forward problem (verification)
Just to verify, we'll use our neural network as the mobility function in our forward finite element solver to demonstrate the resulting pressures are also accurate.
vproblem1 = FEAProblem(nodes, mobility = iproblem1.predict,
                       left_bc=15, right_bc=5)
v1 = vproblem1.solve()
fig, ax = plt.subplots()
ax.set_xlabel(r'$x$')
ax.set_ylabel(r'$p(x)$');
ax.plot(nodes, p1, 'k-');
ax.plot(nodes, v1, 'r-.');
ax.legend([r'$\lambda(x) = x^3 + 0.001$', r'$\lambda(x) = \mathcal{NN}(x)$']);

Validate for different BCs
A major advantage of this approach over say, physics-informed neural networks, is that we have only "learned" the constitutive model, i.e. the mobility function, not the solution of the partial differential equation with the supplied boundary conditions. Instead, we rely on our finite element implementation to compute the solution. Which means we can now use our "learned" constitutive model to solve problems with different boundary conditions accurately.
problem2 = FEAProblem(nodes, mobility = lambda x: x ** 3 + 0.001,
                      left_bc=5, right_bc=20)
p2 = problem2.solve(tolerance=1.0e-4)
problem3 = FEAProblem(nodes, mobility = iproblem1.predict,
                      left_bc=5, right_bc=20)
p3 = problem3.solve(tolerance=1.0e-4)
fig, ax = plt.subplots()
ax.plot(nodes, p2, 'k-');
ax.plot(nodes, p3, 'r-.');
ax.legend([r'$\lambda(x) = x^3 + 0.001$', r'$\lambda(x) = \mathcal{NN}(x)$']);

License
Copyright 2021 John T. Foster
Licensed under the Apache License, Version 2.0 (the "License"); you may not use this file except in compliance with the License. You may obtain a copy of the License at
Unless required by applicable law or agreed to in writing, software distributed under the License is distributed on an "AS IS" BASIS, WITHOUT WARRANTIES OR CONDITIONS OF ANY KIND, either express or implied. See the License for the specific language governing permissions and limitations under the License.
Matlab vs. Python -- A rebuttal
UPDATE 8/12/2019: Mathworks removed the original post this blog was meant to address around the time I completed writing it. However, there may be other useful tips contained in the notebook, so I am posting it anyway. The hyperlink to the original post below has been replaced on the Mathworks website with links to Python/Matlab interoperability features.
I was recently made aware of a post on the Mathworks website where they compare MATLAB and Python in an attempt to make the case that MATLAB is a superior language for engineering and scientific computation.
MATLAB is a useful and powerful computing language and a lot more. It is distributed and used typically through a very polished integrated development environment (IDE) and has many add-on toolboxes for a vast array of scientific computing tasks. While a few of the claims in the post are true, the vast majority of them are seriously misleading.
I'll attempt to counter many of those claims in this post.
The first claim is that MATLAB code is more readable to scientists and engineers than Python code that performs a similar task. They use the following code examples to illustrate their point and even go as far to claim that their is a mistake in the Python operations.

They make the claim that the Python/NumPy solution doesn't have the correct dimensions to support the outer product operation. This is because NumPy was created for element-wise array operations first and foremost. It should be noted that this is a much cleaner syntax for the type of array computing that is typically done in data science, but nevertheless, thier example can easily be corrected by simply adding a second set of brackets to explicitly add the second dimension to the row vector. Initially it will have a shape (1, 3) instead of (3,). This can be seen by looking at the array's shape attribute.
import numpy as np
np.array([1, 2, 3]).shape
np.array([[1, 2, 3]]).shape
The correct code is now (excluding the import numpy as np statement because it is already loaded above)
row = np.array([[1, 2, 3]])

col = row.T

inner = np.dot(row, col)
inner
outer = np.dot(col, row)
outer
Another complaint is that the np.dot operation is a function call instead of a built-in operator. They must not be aware of the @ operator in , e.g.
row @ col
col @ row
Now you might say that the @ operator is not how we would typically write matrix/tensor mathematics in handwriting or in typesetting a book or paper. That is true, but that is the same for the * operator. If you want to be extremely verbose, you could use Einstien indicial notation, i.e.
\begin{align} \vec{a} \cdot \vec{b} = \sum_i a_i b_i = a_i b_i, \quad &\mbox{(inner product)} \\ \vec{a} \otimes \vec{b} = a_i b_j, \quad &\mbox{(outer product)} \end{align}
where the convention is that the summation over any repeated index implies summation and the $\sum$ notation can be dropped. This can be implemented in via NumPy as
row = np.array([1, 2, 3])

inner = np.einsum('i,i', row, row)
inner
for the inner product and
outer = np.einsum('i,j', row, row)
outer
for the outer product. Of course, these require function calls to np.einsum, but the indicial notation syntax follows the written tensorial mathematics notation in a natural way.
Adding the additional dimension can be done through indexing as well if the initial array doesn't include enough dimensions, e.g.
row[:, None] @ row[None, :]
As mentioned above, NumPy was designed for element-wise array computations, and this syntax is much cleaner, e.g.
a = np.arange(10); a
b = np.arange(10, dtype=np.double); b
c = a * b
c
An equivalent expression in MATLAB requires the use of a period (.) in front of the multiplication operator.
c = a .* b
This syntax can become unsightly in long expressions.
Let's examine a few more claims:
Engineers and scientists deserve tools that fit the way they work. They shouldn’t have to adapt the way they work to fit their tools.
Python functions are typically designed and documented by advanced programmers for other experienced programmers.
The definition of an advanced programmer is imprecise and subjective. Do they mean to imply that MATLAB is not designed and documented by advanced programmers? The reality is that many of the Python packages for scientific computing, e.g. NumPy and SciPy were developed by engineers. The initial core developer of both of those packages was Travis Oliphant, an electrical engineer by training, while he was a graduate student and later as a professor of electrical engineering. While we don't know who exactly is writing Matlab code, the scientific Python packages are developed in the open, on Github, where you can view the profiles of the individual contributors. Take a look for yourself, in addition to Oliphant, the second largest contributor is Charles Harris a physics major and mathematician (the mother and father disciplines of engineering...), the third largest contributer is David Cournapeau an electrical engineer and data scientist, etc.
Python development environments for scientific computing lack the reliability and integration of the MATLAB desktop.
Ever heard of Spyder IDE?

Looks a lot like MATLAB...
Everything about MATLAB is designed specifically for engineers and scientists:
- Function names and signatures are familiar and memorable, making them as easy to write as they are to read.
The same is true of NumPy and SciPy, many of the names are identical to thier MATLAB equivalents.
New function interfaces undergo a rigorous design process that typically involves dozens to hundreds of developer-hours per function.
So you say... Can I see your test suite? Logs from the latest continuous integration run? Code coverage? I can for NumPy all 10,000+ tests, on multiple platforms (Windows, MacOS, Linux) and the code coverage. Same goes for SciPy and most of the rest of the scientific Python suite.
Exploration and iteration
They claim:
The desktop environment is tuned for iterative engineering and scientific workflows.
There are many options in the Python world that offer the same, Spyder as already mentioned, the PyCharm IDE, and of course the venerable Project Jupyter with JupyterLab and Jupyter Notebooks.
Integrated tools support simultaneous exploration of data and programs, letting you explore more ideas in less time.
Again Spyder, PyCharm, and JupyterLab offer many of the same features built in and additionally the growing world of extensions to Jupyter Notebooks and JupyterLab, e.g. a visual debugger. Not to mention the ease of creating interactive dashboards in Jupyter Notebooks, i.e.
from ipywidgets import interact
import seaborn as sns; sns.set()
import matplotlib.pyplot as plt
%matplotlib inline

x = np.linspace(0, 2*np.pi, num=100)

@interact
def sine_plot(a=(0,10,1)):
    plt.plot(x, a * np.sin(x))
    plt.ylim([-10, 10])
Documentation
Documentation is written for engineers and scientists, not computer scientists.
Let's compare the documentation from two similar functions. First from NumPy:
from IPython.display import IFrame
IFrame('https://docs.scipy.org/doc/numpy/reference/generated/numpy.linspace.html', width=800, height=400)
Now from MATLAB
IFrame('https://www.mathworks.com/help/matlab/ref/linspace.html', width=800, height=400)
It's impossible to understand the argument here. Both functions documentation are equally clear in explaination. And the same is true for all of the functions in NumPy and SciPy.
Machine learning
Next they quote a customer:
"As a process engineer I had no experience with neural networks or machine learning. I worked through the MATLAB examples to find the best machine learning functions for our predictive metrology use case. I couldn’t have done this in C or Python—it would’ve taken too long to find, validate, and integrate the right packages."
-Emil Schmitt-Weaver, ASML
I can't argue with the statement in respect to the C programming language. But, in the Python ecosystem we have Scikit-Learn which is quite possibly the world's most used machine learning framework. The documentation is extremely extensive with many examples and tutorials. Included is this extremely helpful flowchart for assistance in choosing a machine learning model to apply
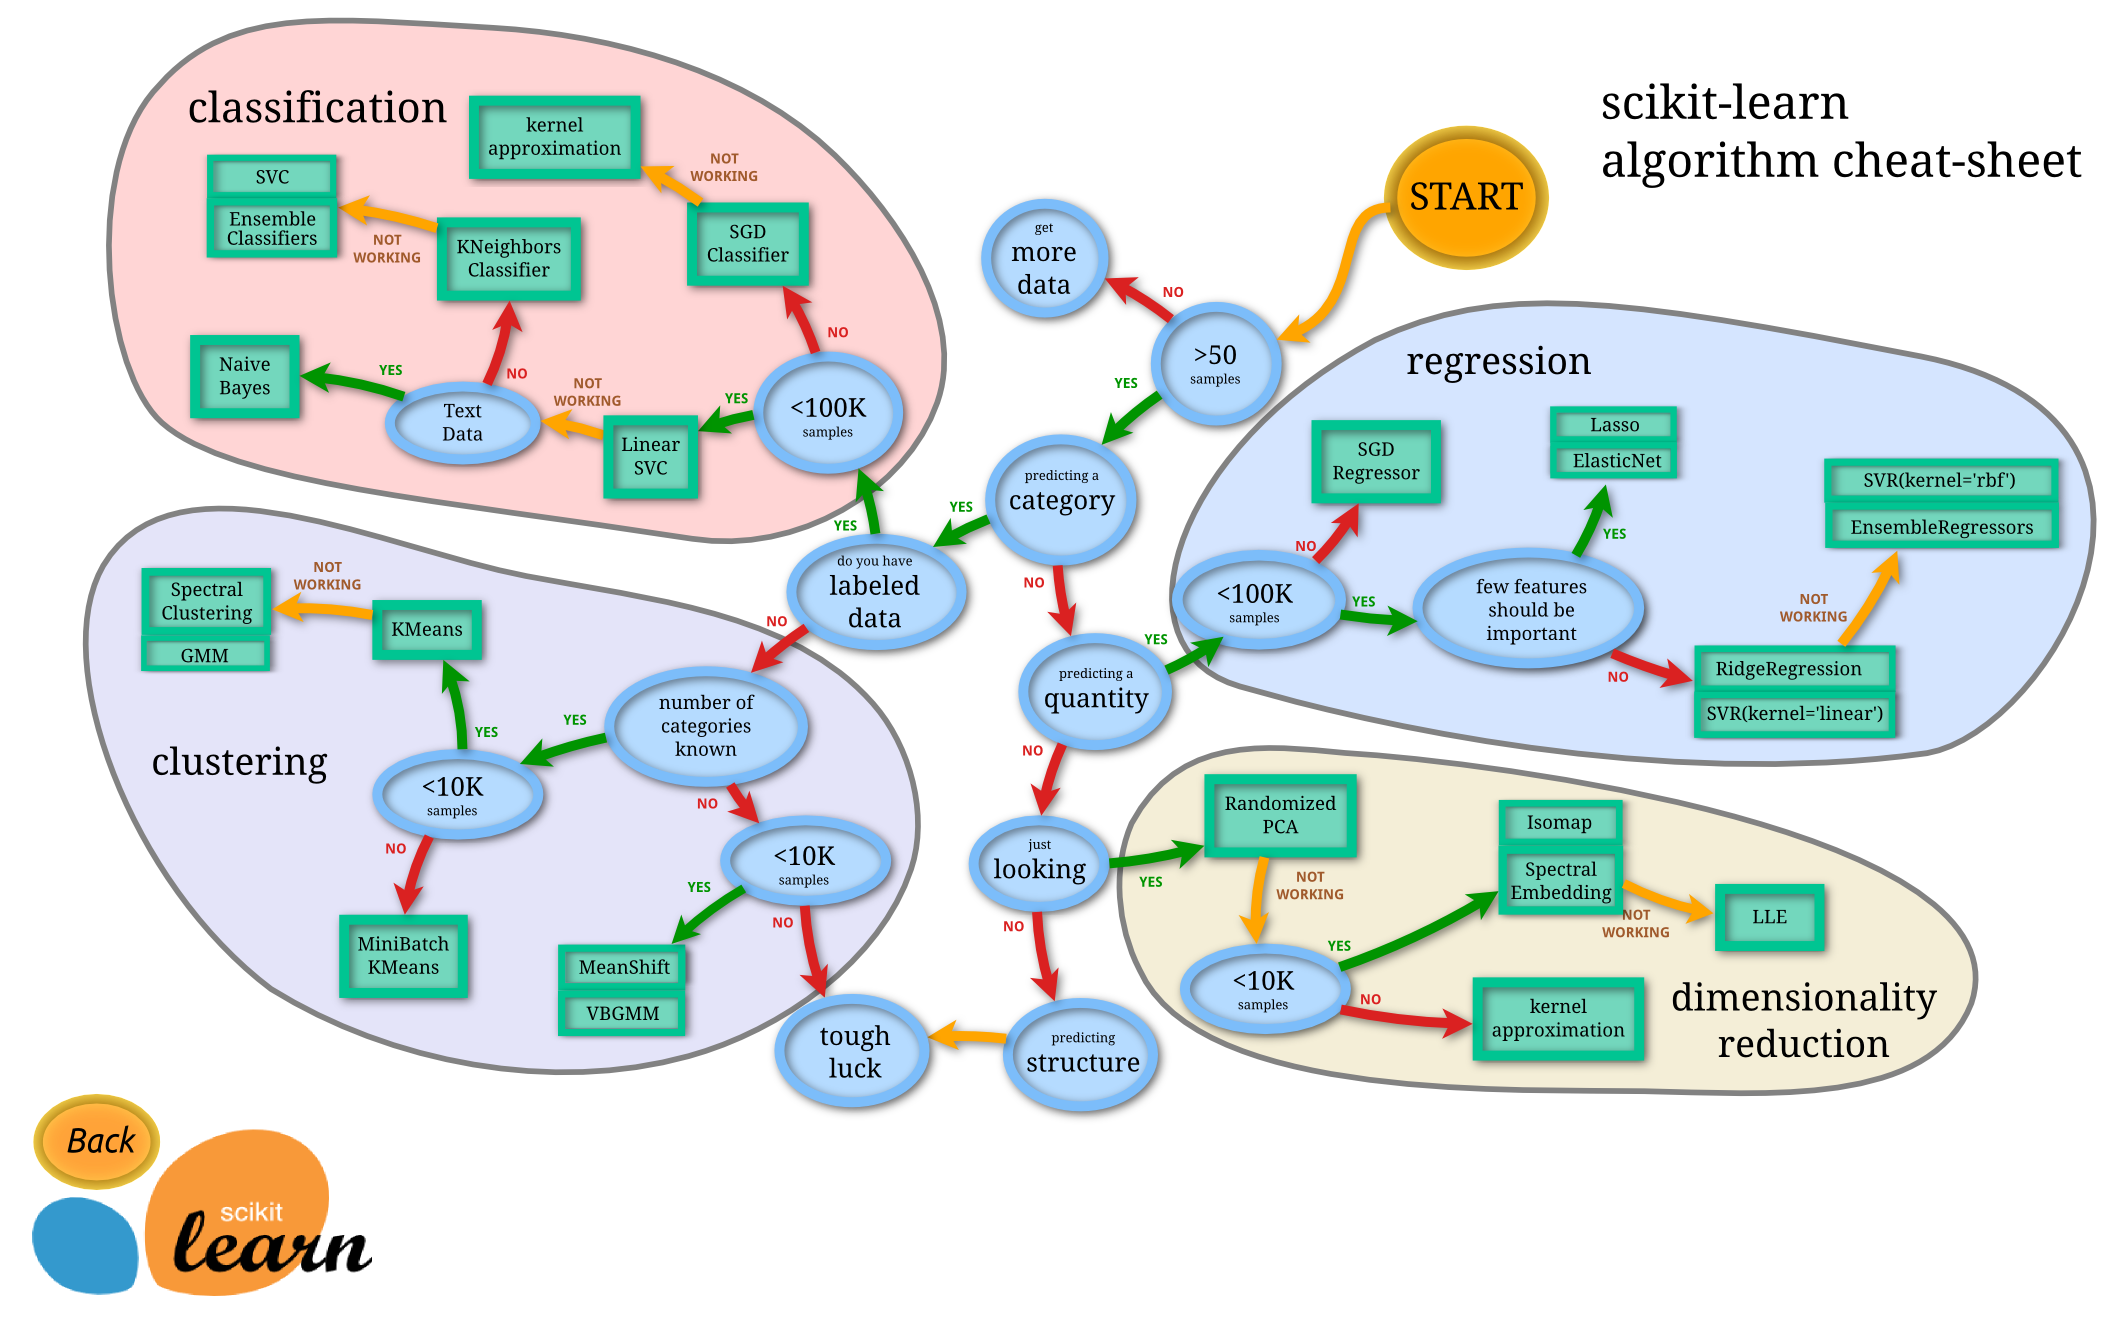
when viewed from the original documentation website the different estimators include hyperlinks to the documentation for each method.
Scikit-learn, NumPy, SciPy, Spyder IDE, Jupyter Notebooks and 100s more useful packages and tools are all included in the free Anaconda Python Distribution. It can be installed on all major computer operating systems (Windows, Linux, MacOS) with a one-click download and downloads and installs in far less time than even the base distribution of MATLAB. It includes a convenient application launcher for the different IDEs/Jupyter Notebooks/JupyterLab, etc. It couldn't be easier to get started with the Python scientific computing stack than it is to use the Anaconda Distribution.
Apps and dashboards
Next, they introduce MATLAB Apps and claim that "Python doesn't offer integrated workflow apps for scientific and engineering applications". Well, that is true in the sense that they are not integrated into any type of distribution. Many of the MATLAB Apps they cite are not part of the standard MATLAB distribution either, they are offered as separate products for purchase. This is true of the Curve Fitting Toolbox for example.
However, as Python has a much larger overall user base, there are many examples of complicated applications built using open source tools freely available, e.g. New York City Taxi Explorer. In fact, we can build a simple user interface for curve-fitting in just a few lines of Python.
import param
import panel as pn
import pandas as pd
from scipy import stats
pn.extension()

class CurveFit(param.Parameterized):

    dataset = param.FileSelector(path='./*.csv*', label="Choose a file")

    fit_curve = param.Boolean(False, label="Fit Curve")

    @param.depends('dataset','fit_curve', watch=True)
    def view(self):

        data = pd.read_csv(self.dataset)

        fig, ax = plt.subplots()

        if self.fit_curve:
            slope, intercept, _, _, _ = stats.linregress(data['x'], data['y'])

            ax = sns.regplot(x="x", y="y", data=data, color='blue',
                        line_kws={'label':"y={0:.1f}x+{1:.1f}".format(slope,intercept)})

            ax.legend()
        else:
            data.plot.scatter(x="x", y="y", c="blue", ax=ax)


        plt.close(fig)
        return fig

curve_fit = CurveFit(name="")
pn.Column(curve_fit.param, curve_fit.view)
Of course this could be made far more feature rich, but the basic idea is demonstrated with a minimal amount of code.
Next claim:
MATLAB helps automate the entire path – from research to production.
This is just a sales pitch for another separate product to purchase. This time for MATLAB Production Server. With claims about deployment of MATLAB applications to IoT devices, cloud, GPUs, etc. As Python is installed by default or easily added to virtually every Linux server in the world, Python applications can be easily deployed, for free, to all of these places as well.
On performance
They display this figure

but provide no supporting source code for the comparisons. Of course, if they are comparing vectorized and/or compiled MATLAB code to pure Python for-loops, MATLAB will always be faster. Let's do a few of our own comparisons...
Lets add 1 to a million numbers. We'll define a function in pure Python syntax (no NumPy):
def add_one(array):
    array_plus_one = []
    for i in array:
        array_plus_one += [i + 1]
    return array_plus_one

x = range(1000000)
We can use the IPython magic command %timeit to time the execution of this function and report some statistics.
%timeit add_one(x);
Of course, in the code above, the array array_plus_one is reconstructed every time through the for-loop. We can get a little more performance and a cleaner syntax by using a Python List Comprehension.
def add_one_comprehension(array):
    array_plus_one = [i + 1 for i in array]
    return array_plus_one
Again using the %timeit module we can see that the list comprehension approach is somewhat faster.
%timeit add_one_comprehension(x)
One of the claims in the article is that all MATLAB code is just-in-time (JIT) compiled. Python has a just-in-time compiler as well available through the Numba package. All we have to do is import and add a one line function decorator to the code above to use it.
from numba import jit

@jit(nopython=True)
def add_one_numba(array):
    array_plus_one = [i + 1 for i in array]
    return array_plus_one

x = np.arange(1000000, dtype=np.double)
Here we see an additional performance gain with very little effort by using the JIT compilation. I call the function once to allow the JIT compilation to occur before executing the timing operation.
_ = add_one_numba(x)
%timeit add_one_numba(x)
Finally we move to the easiest solution. Using NumPy arrays and broadcasting the addition.
def add_one_numpy(array):
    return array + 1
And we see an improvement of about 2 orders of magnitude.
%timeit add_one_numpy(x)
Finally, we can squeak out a little more performance by adding JIT compilation (with parallel execution) to the NumPy function. Like last time, we'll call the function to allow JIT compilation before executing the timing operation.
@jit(nopython=True, parallel=True)
def add_one_numpy_numba_parallel(array):
    return array + 1
_ = add_one_numpy_numba_parallel(x)
%timeit add_one_numpy_numba_parallel(x)
Appears to be only a tiny bit faster, but not meaningfully so, perhaps if the vector x were much larger we could see the true benefit of parallel execution.
Now we'll write similar code in MATLAB, writing a function file
%%file add_one.m
function array_plus_one = add_one(array)

for i = 1:length(array)
    array_plus_one(i) = array(i) + 1;
end
end
and running the code from the command line. Here, notice I allocate the argument x first and make a function call to add_one before a second call to add_one() surrounding by the timing marks tic and toc. This is to allow any JIT compilation to occur before attempting the timing. We don't get the statics that %timeit gives us, but we do see that this implementation is faster than the pure Python approach, but slower than the Numba JIT code from Python and much slower than the NumPy code.
!/Applications/MATLAB_R2019a.app/bin/matlab -batch "x=0:999999;add_one(x);tic;add_one(x);toc;"
Even though the code above was written to be as close to the pure Python approach above, most folks know that preallocating your arrays in MATLAB can speed up the code. So let's do that.
%%file add_one_preallocate.m
function array_plus_one = add_one(array)

array_plus_one = zeros(size(array));

for i = 1:length(array)
    array_plus_one(i) = array(i) + 1;
end
end
A little improvement here, but still not anywhere near the speed of the NumPy code.
!/Applications/MATLAB_R2019a.app/bin/matlab -batch "x=0:999999;add_one(x);tic;add_one_preallocate(x);toc;"
Finally, let's try the vectorized approach in MATLAB.
%%file add_one_vectorize.m
function array_plus_one = add_one(array)

array_plus_one = array + 1;
This is by far the fastest approach in MATLAB; however, it's still slower than the NumPy code above.
!/Applications/MATLAB_R2019a.app/bin/matlab -batch "x=0:999999;add_one_vectorize(x);tic;add_one_vectorize(x);toc;"
Now I'm not making the claim that Python/NumPy code will always be faster that MATLAB. But it wasn't too difficult to find some (very) simple examples where that is the clearly not the case. If they are going to make bold claims like the ones shown in the figure above, they should publish the source codes of each implementation to ensure that the codes are written in a respectively equal way. There are lots of small optimizations that can be made in either language to speed up code run times.
Other comments
They go on with many more claims and report the purported downfalls of Python, such as the fact that Python is a general purpose computing language and not a math- and matrix-oriented language. This is in fact an asset, not a hindrance of Python. The general purpose nature means there are far more users overall, which translates into more help for beginners getting started. Python is the 5th highest tag on Stack Overflow, a question and answer website for programmers. Matlab does not appear as a tag on the at least first page of 32 different tags.
They complain that the visualization tools in the Python ecosystem are fragmented. Well yes, there are several different useful libraries for visualization. However, Matplotlib is the default choice and mimics most or all of the capabilities of MATLAB as it was heavily inspired by it. In fact, I'll make the claim that any 2D visualization you've ever seen can be reproduced with Matplotlib. See the extensive examples gallery for further evidence of this claim. There are other great plotting libraries, like Bokeh who's focus is on generating interactive figures rendered with JavaScript and intended for display on web pages. These can include plots that can have callbacks into the Python language for interactive updating via complex computation and/or realtime streaming data.. These types of interactive visualizations can be deployed to webpages, for free. Any interactivity available via MATLAB visualizations requires a licensed version of MATLAB running to serve the visualization. These cannot be deployed, certainly not for free, to the everyone via a standard web server. Matplotlib and Bokeh can be selectively used as a backend in a unified plotting library called Holoviews. Holoviews allows you to create beautiful visualizations with few commands that can be rendered with either Bokeh (for figures intended for web pages) or Matplotlib (for figures intended for print publications) with ease. If you prefer the Grammer of Graphics approach to visualization there are other great packages like Altair and ggplot. Again, the diversity of choices is an asset, not a hindrance to the Python ecosystem.
They claim that "MATLAB Coder generates readable, portable C and C++ code". Another sells pitch for a product offered outside of the base MATLAB distribution. Because of the open-source and portable nature of Python and the Python scientific packages, there often no reason to do such a thing. The entire package framework can often be moved to production with the need to change anything and certainly without the licensing issues one would face running MATLAB. A more frequent use case is to use Python to "glue" together C/C++/Fortran function calls from libraries. We've already demonstrated how we can get near C-code speed with Numba, and that's often more than adequate. There are other packages like CFFI that allow you to write and compile C-code that can easily be called from Python. This includes code that calls functions from other libraries such as OpenMP for thread parallelism. Below is a simple example, the key part here is the C-code contained in the ffibulder.set_source() argument. It uses OpenMP to make the for-loop thread parallel.
%%file omp_add_one_builder.py
import os
from cffi import FFI
ffibuilder = FFI()

ffibuilder.set_source("omp_add_one",
   r"""
   #include "omp.h"

   void add_one(const int n, const double *x, double *result){

   int i;
   #pragma omp parallel for private(i)
   for (i = 0; i < n; i++){
        result[i] = x[i] + 1;
        }
   }
   """,
   library_dirs=[os.environ['CONDA_PREFIX'] + '/lib'],
   include_dirs=[os.environ['CONDA_PREFIX'] + '/include'],
   libraries=['omp'])

ffibuilder.cdef("""
    void add_one(const int n, const double *x, double *result);
""")

if __name__ == "__main__":
    ffibuilder.compile(verbose=False)
Now we can compile the code into a dynamic library and CFFI automatically generates the Python interface wrapper.
%run omp_add_one_builder.py
Here is short script that calls the function. Mimicking the behavior of the add_one functions above.
from omp_add_one import ffi
from omp_add_one import lib as omp

N = 1000000

x = np.arange(N, dtype=np.double)
result = np.empty_like(x)

x_ = ffi.cast("const double*", ffi.from_buffer(x))
result_ = ffi.cast("double *", ffi.from_buffer(result))

%timeit omp.add_one(N, x_, result_)
Of course, this is faster than all but the add_one_numba_parallel() function above (they are essentially the same speed) because they effectively both have equivalent object code.
Finally, most of the rest of the arguments in their post make statements related to a lack of integrated features in Python. I assume they are talking about the core Python language and this is very misleading in the context of Scientific computing because no one work works in this space attempts to do so with pure Python, everyone uses the libraries discussed in this post and commonly, folks are simply installing the Anaconda Distribution in which all of these packages are integrated into one maintained system with compatible libraries, visualization tools, sand-boxed environments for exploration and prototyping, a choice of IDEs, and many more features.
This post can be acessed in it's original for as a Jupyter notebook here. Of course, you will need a running installation of MATLAB and possibly have to change the file paths to the executable to get this those code cells with the MATLAB timings to work properly.
Peridigm tutorial
I recently gave a short introduction to Peridigm, the massively parallel computational peridynamics code. It briefly covers, the history of Peridigm, and tips on building, running, extending, and learning to use Peridigm.
Debugging C/C++ libraries called by Python
I've been debugging a C++ library that I wrote and am calling from Python via a CFFI interface. After an hour or two of debugging with print-statements without resolution, I decided to figure out how to use a proper debugger. I'm very comfortable on the command-line and have used gdb in this way often in the past, so am happy I found an easy solution. The instructions that follow should work for any C/C++ library built with debug flags enabled (i.e. the -g compiler flag) that is called from Python. While I am using CFFI, it should also work for ctypes or SWIG interfaces. Also the commands below are specific to the lldb debugger, but could be easily translated to gdb.
First, in two separate terminal windows, launch ipython and lldb. At the IPython prompt, type:
In [1]: !ps aux | grep -i ipython
and look for the process ID (pid) of the IPython session. Let's assume the process ID in our case is 1234. Go to the lldb command prompt and attach to the IPython session with
(lldb) attach --pid 1234
followed by
(lldb) continue
to release the process. Now your ready to set breakpoints, etc. For example, to set a breakpoint on line 400 of a myfile.cpp we would type
(lldb) breakpoint set -f myfile.cpp -l 400
Assuming myfile.cpp is compiled into a library that is called by the Python script/module myscript.py, we can now run the Python code in the IPython terminal
In [2]: run myscript.py
Back in the lldb terminal we should see our code stopped on line 400. Debug away...
P.S. I found the bug after 5 minutes in a proper debugger...
git and Github tutorial
Extracting Exodus information with netcdf-python
In an earlier post I demonstrated how to use a set of ctypes wrappers of Sandia's Exodus database format, i.e. the exodus.py script that is distributed with Trilinos, to extract information from an Exodus database. Exodus is a finite element format library that is build upon NetCDF4 and HDF5. While the use of exodus.py makes for a straightforward and intuitive interface to the database, it requires that Trilinos (at least the SEACAS packages) be installed as shared libraries with an $ACCESS environment variable in your $PATH pointing to the library root. This setup is cumbersome if you don't have any other reason to have Trilinos installed. Thankfully, since Exodus files are NetCDF files are HDF files, we can use other tools to access the data. One of those, that is mature and available in the Python Package Index is netcdf4-python. It can easily be installed via pip i.e.
pip install netcdf4
or if your using the popular Anaconda Python distribution then
conda install netcdf4
should do the trick. This is all we need to have installed to read from an Exodus database. The simple 2D finite element mesh I will be using in the following example can be downloaded here
First we'll import the netCDF4 module and of course Numpy.
import netCDF4
import numpy as np
To open the Exodus file for reading we use the following command.
nc = netCDF4.Dataset('../files/s_curve.g')
Here we are using a "Genesis" file which is a Exodus file used for finite element model input. It typically contains information about the nodal coordinates, mesh connectivity, nodesets for boundary condition application, etc. A common source of creation for these forms of Exodus files is the mesh generation tool Cubit. We could access the output variant of an Exodus file (i.e. a *.e file) in the same manner.
Unless you take a lot of time carefully naming all your variables, nodesets, blocks, etc. during the creation of the database, the variables will be given default names which we can use to access that data. The default names are intuitive enough so that with a little investigation of thier properties, you can usually figure out what they refer to. To see all of the information of the database we can simply
print nc
Or to get even more information about the variables
nc.variables
I won't attempt to decipher all the information in the database as you can use the Exodus API reference for that. Below, I'll show a short example of how we might do something useful. First we will extract the X and Y nodal coordinate locations from and the connectivity array. The first 10 entries of the connectivity array are shown.
X = nc.variables['coordx']
Y = nc.variables['coordy']
connect = nc.variables['connect1']
print connect[0:10]
Now we'll use the nodal locations and the connectivity array to plot a visualization of the mesh. First, we upload the required libraries from matplotlib.
%matplotlib inline
from matplotlib.patches import Polygon
from matplotlib.collections import PatchCollection
import matplotlib.pyplot as plt
import matplotlib
Now we'll create an array that contains the $x,y$ nodal coordinate location pairs and extract, via Numpy fancy indexing, the coordinates for each quadralateral in the mesh creating polygons with them for visualization.
xy = np.array([X[:], Y[:]]).T

patches = []
for coords in xy[connect[:]-1]:
    quad = Polygon(coords, True)
    patches.append(quad)

fig, ax = plt.subplots()
colors = 100 * np.random.rand(len(patches))
p = PatchCollection(patches, cmap=matplotlib.cm.coolwarm, alpha=0.4)
p.set_array(np.array(colors))
ax.add_collection(p)
ax.set_xlim([-4, 4])
ax.set_ylim([-4, 4])
ax.set_aspect('equal')
plt.show()

The colors have no meaning other than to give each element a random color. Now we'll close the Exodus file, completing our analysis.
nc.close()
Interactive C++ for HPC
I recently discovered cling after I saw this Tweet
I made a C++ kernel for Jupyter for some reason: https://t.co/7ApuZyeR0r
— Min RK (@minrk) May 19, 2015
From the cling website, "Cling is an interactive C++ interpreter, built on the top of LLVM and Clang libraries. Its advantages over the standard interpreters are that it has command line prompt and uses just-in-time (JIT) compiler for compilation." As I write (or mostly teach through dual-coding with students) quite a bit of C++ and have already been utilizing the IPython/Jupyter notebook as a teaching tool for sometime, I was immediately interested in using MinRK's clingkernel for this purpose as well as exploring and testing out my own ideas. As I learned more about cling, I found most of the examples to be very trivial and those that inluded the calling/loading of external functions typically only utilized the functions from the standard library. I was eager to give it try on something a little more complex, and because most of the code we write in my group is heavily dependent on Trilinos, I thought I would attempt to solve a simple linear algebra system of the form
$$ A \vec{x} = \vec{b} $$
using AztecOO solvers with Epetra datastructures from Trilinos (at least AztecOO and Epetra). This is an adaptation of the example code provided in Figure 1 of the AztecOO User's guide.
Of course, to reproduce the code below, you will need to install cling and Trilinos. Additionally, if you want to use MinRK's clingkernel you need to install the Jupyter notebook from the master branch, and install the kernel. With that, you should be able to download this notebook and execute it with few modifications.
Cling provides a few metaprocessing commands to perform actions that you would normal provide as arguments to the build system, such as providing locations for include files, loading shared libraries, etc. The documentation for the metaprocessing commands are
.x test.cpp – load a file (if the file defines void test() it will be executed)
.L libname – load a libary or file
.x filename.cxx – loads filename and calls void filename() if defined
.I path – adds an include path
.printAST – shows the abstract syntax tree after each processed entity
.q – exit cling
.help – display a brief description
We'll start by loading the location of the installed header files in my Trilinos build (here I only built AztecOO and Epetra in serial to keep it simple). Cling utilizes the Clang compiler which is pretty picky, so I had to edit the header files in a few locations where #include statments where provided with angle brackets < > for local includes, where the compiler wanted double quotes. In other words, I had to change
#include <foo.h>
to
#include "foo.h"
in a few of the Trilinos headers. So the metaprocessing command to tell the system where the header files are:
.I /usr/local/trilinos-serial/include/
And now we provide the include statememts.
#include "AztecOO.h"
#include "AztecOO_Version.h"
#include "Epetra_SerialComm.h"
#include "Epetra_Map.h"
#include "Epetra_Vector.h"
#include "Epetra_CrsMatrix.h"
Now the metaprocessing to load the shared libraries. Since I'm on a Mac, I had to define the environment variable
export DYLD_LIBRARY_PATH=/usr/local/trilinos-serial/lib:$DYLD_LIBRARY_PATH
before launching the notebook/cling so the system knows where to find the libraries at runtime. On a Linux machine, this variable would be LD_LIBRARY_PATH.
.L libepetra
.L libaztecOO
Now we start in with the actual Epetra/AztecOO code. Since it's not apparent to me whether it's possible for cling to support MPI processes, we'll just provide a serial implementation. We start with some code that instantiates the Epetra serial communicator and provides some information about the version of Trilinos we are using.
Epetra_SerialComm Comm;

int NumMyElements = 1000;

if (Comm.MyPID()==0)
    std::cout << AztecOO_Version() << std::endl << std::endl;

  std::cout << Comm <<std::endl;
Notice the immediate output to screen. Remember this is C++!
Now we construct a Map that puts same number of equations on each processor. Of course, we only have one processor here, but the code is generic and could also be run in parallel if multiple processors were available.
Epetra_Map Map(-1, NumMyElements, 0, Comm);
int NumGlobalElements = Map.NumGlobalElements();
Now we instantiate the column-row sparse matrix $A$
Epetra_CrsMatrix A(Copy, Map, 3);
Here we fill $A$ to be a finite-difference like operator.
double negOne = -1.0;
double posTwo = 2.0;
for (int i=0; i<NumMyElements; i++) {
    int GlobalRow = A.GRID(i); int RowLess1 = GlobalRow - 1; int RowPlus1 = GlobalRow + 1;

    if (RowLess1!=-1) A.InsertGlobalValues(GlobalRow, 1, &negOne, &RowLess1);
    if (RowPlus1!=NumGlobalElements) A.InsertGlobalValues(GlobalRow, 1, &negOne, &RowPlus1);
    A.InsertGlobalValues(GlobalRow, 1, &posTwo, &GlobalRow);
};
Now we call the FillComplete() method to optimize storage of the matrix.
A.FillComplete();
Here we instantiate $\vec{x}$ and the right-hand-side vector $\vec{b}$. Also, we fill $\vec{b}$ with random numbers for our solution.
Epetra_Vector x(Map);
Epetra_Vector b(Map);

b.Random();
Now we instantiate the Epetra_Problem and the Aztec solver from that instance.
Epetra_LinearProblem problem(&A, &x, &b);

AztecOO solver(problem);
Next is the actual solution step. A GMRES solver is used for 10 iterations. This won't be enough for convergence of the solver, but this is just for demonstration purposes and I would like to keep the output short.
solver.SetAztecOption(AZ_precond, AZ_Jacobi);
solver.Iterate(10, 1.0E-2);

std::cout << "Solver performed " << solver.NumIters() << " iterations." << std::endl;
std::cout << "Norm of true residual = " << solver.TrueResidual() << std::endl;
To demonstrate that is worked, we'll print out the first 10 values of the solution vector $\vec{x}$.
for (int i = 0; i < 10; i++){
    std::cout << x[i] << std::endl;
}
It's pretty amazing to be able to do interactive C++ developement. If we could get this to work in parallel, it would be a leap forward in the ability to do introspective high-performance scientific computing.
Python/Numpy implementation of Bspline basis functions
I was recently helping a student with some preliminary concepts in isogemetric analysis (IGA) and after taking a look at his pure Python implementation of the Cox - de Boor algorithm for computing B-Spline basis functions, I decided to look around for a Numpy implementation that could possibly be a little faster. While I found a few B-spline implementations in Python, I thought I might be able to sqeeze out a little more performance through vectorization and memoization while maintaining readablity of the code. I think I have something that accomplishes that, in the context of how basis functions are needed and used in IGA. The main portion of the code is here:
The full repository can be found/forked here: johntfoster/bspline.
An example use case is shown below. This reproduces Fig. 2.6 in Isogeometric Analysis: Towards the integration of CAD and FEA by Contrell, Hughes, and Bazilevs. With bspline.py in the working directory:
from bspline import Bspline

knot_vector = [0,0,0,0,0,1,2,2,3,3,3,4,4,4,4,5,5,5,5,5]
basis = Bspline(knot_vector,4)

%matplotlib inline
basis.plot()

As mentioned above the recursive function that computes the basis has been memoized such that it caches repeated evaluations of the function. This has a large impact on the evaluation speed. We can use Jupyter's %%timeit magic function to investigate this. I've hidden the raw evaluation functions through Python's name mangaling, therefore the following function is not intended for general API usage, but for testing purposes, let's evalute the basis functions defined by the knot vector and basis order given above using the non-memoized code:
import numpy as np
x = np.linspace(0,5,num=1000)
%%timeit
[ basis._Bspline__basis(i, basis.p) for i in x ]
Now let's time the memoized code
%%timeit
[ basis(i) for i in x ]
A speedup of roughly two orders of magnitude!