Managing a professional website with Nikola, LaTeX, Github and Travis CI
As an academic, ensuring that others are aware of and can easily access recent research results, papers, and other professional communications is an important part of the "branding" we are tasked with as quasi-business managers in running our research programs. Most of us keep an up-to-date Curriculum Vita (CV) for purposes of annual performance reviews, proposal submissions, etc. I maintain my own CV judiciously, updating it in near real-time after any new paper is published, talk is delivered, or award is given.
For several years, I have maintained my CV using the LaTeX typesetting system. I prefer the elegant typesetting of LaTeX, but mostly I prefer to keep my published papers stored in a BibTeX database and use the citations not only in my CV, but also in journal articles, and other forms of communication. Maintaining only one BibTeX database with all my papers reduces reproduction of work from paper-to-paper. I also learned at some point that I could use the htlatex utility distributed with TeXLive to convert my LaTeX CV into HTML for posting on the web.
I have recently designed a professional website to introduce myself, advertise my research, and include professional information and resources, one of them being my CV. After being a Wordpress user for many years, for this website I switched to the great static blog/website generator Nikola. I love the ability to edit plain text files in Vim using Markdown, ReST, or even a mix of Markdown, LaTeX, and HTML through pandoc integration. The icing-on-the-cake is the ability to create blog posts with the nascent IPython Notebook. Nikola also has built-in support for deploying to GitHub Pages, which while it's not difficult to home-roll a deployment scheme, this additional feature is nice for beginners using GitHub Pages.
Because I update my CV much more frequently than I would need to update the website in general, and have for sometime utilized git as a version control tool, I decided to push the CV repository to GitHub and see if I could devise a scheme to automate the workflow of keeping not only my CV up-to-date, but also regenerating my professional website automatically upon a git push to the CV repository. I found this to be pretty straightforward with the help of Travis CI. If your not familiar with Travis, it is a continuous integration system, typically used in software testing. It integrates seamlessly with GitHub, such that upon any git push to GitHub, Travis will pull a current version of the repository and run a set of commands specified in a travis.yml file. In summary, here is my workflow for keeping everything updated:
- Edit CV
- Commit changes to local repository and push to GitHub
- Travis builds CV in PDF and HTML versions
- Upon a successful build, Travis pushes new PDF and HTML versions to a branch on the CV repo
- Travis then triggers a rebuild of the professional website which is stored in it's own repo
- Travis then rebuilds the professional website with Nikola and includes the new HTML CV as a page
I'll now walk through the key parts of each step of the workflow:
Edit CV
I am assuming you have a LaTeX CV to edit or a template your working from. Feel free to use my own and modify it in anyway you like to suit your own needs/preferences. It's a good idea to ensure the CV builds locally first, I prefer to use latexmk for this. The following .latexmkrc works for me both locally on Mac OS X as well as on the Linux Ubuntu machines that Travis CI utilizes.
The \\\def\\\ispdf{1} part is because my cv.tex file has a definition statement in it that modifies the output slightly (regarding fonts) depending on whether you are requesting a PDF output or the HTML output. The extra backslash characters are to escape correctly in the bash shell. A default run of latexmk with this .latexmkrc file should create a PDF version of the CV. While counter-intuitive, a run of latexmk -pdf will actually produce an HTML version of the CV, this is because the pdflatex command has actually been redefined to htlatex on the second line of the .latexmkrc file. Even if the desire is to build an HTML version, latexmk must be run first to produce the correct cross-references and .aux file.
Commit changes to local repository and push to GitHub
There are so many great git and GitHub resources out there, I'm going to assume you know or can find out about basic git usage. There is one important think to note for the first commit to GitHub. You may run into problems if there is not an alternate branch of the repository for Travis to push the build results to. You can create a branch with the following command:
git checkout -b travis-build --orphan
This will create a new branch called travis-build with no history. You should then remove all the files in this branch, commit, and push to GitHub
git rm -rf *
git commit -m "First commit to travis-build branch"
git push origin travis-build
assuming the default origin name for your GitHub repository. Now switch back to your master branch, and push to GitHub, the travis.yml file in your repository (details covered below) will instruct Travis on how to build the repository
git checkout master
git commit -am "A commit message detailing changes"
git push origin master
Travis builds CV in PDF and HTML versions
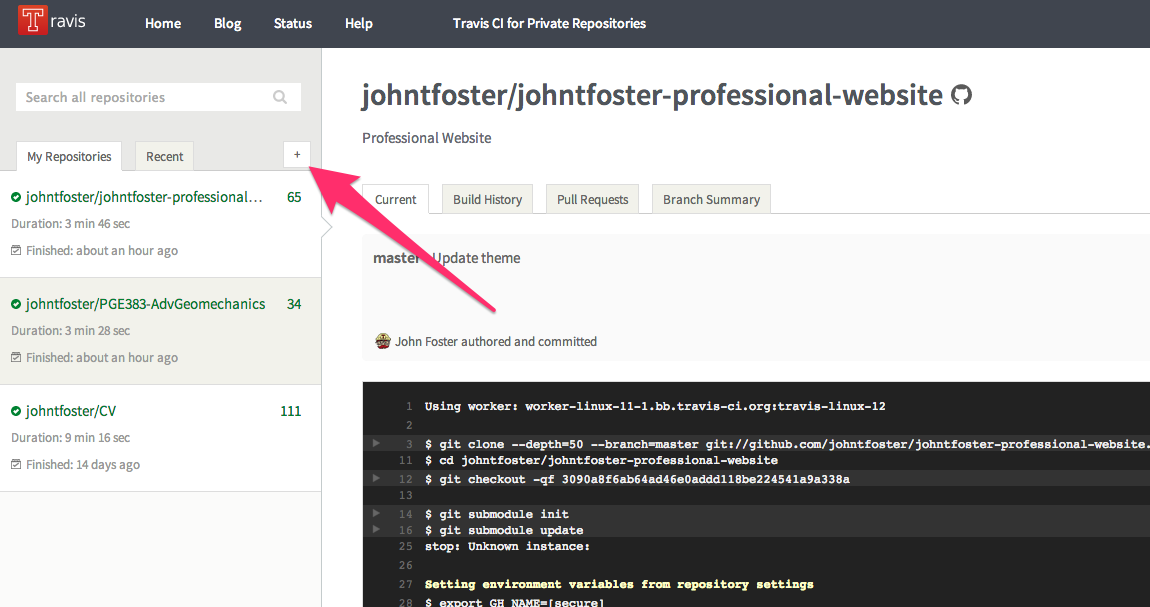
You will need to enable Travis CI for your repository. After signing into Travis via your GitHub username, you can add any public GitHub repository for free continuous integration services. You can add a repository by clicking on the + arrow in the left-hand panel of Travis as shown
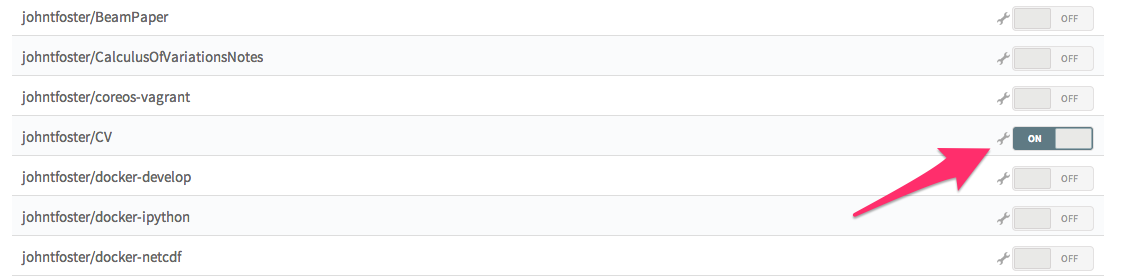
Then click the ON button to enable Travis.
Upon committing, Travis reads the travis.yml file in the repository and performs a set of actions. In this case, we want to build a LaTeX file which there is not a preinstalled Travis Ubuntu instance for LaTeX so we need to use apt-get to install all of the LaTeX dependencies and proper fonts for building the CV. The other commands just some basic Travis configuration, full details for Travis configuration can be found here
Once all of the dependencies are installed, Travis will build both the PDF and HTML versions of the CV with
After a successful build, Travis will clone the previously created travis-build branch, copy the newly created PDF and HTML files into this branch, commit them, and push them back to GitHub. This requires setting up a few environment variables, that can be added to the Travis project page. The variables are GIT_EMAIL, GIT_NAME, GH_TOKEN, and TRAVIS_TOKEN. The first two just correspond to basic git configuration and are really just used to store the information of the person who make the commit in the git history. Since it's actually Travis making the commit, I just define the variables as
GIT_NAME="Travis CI"
GIT_EMAIL=travis-ci@travis.org
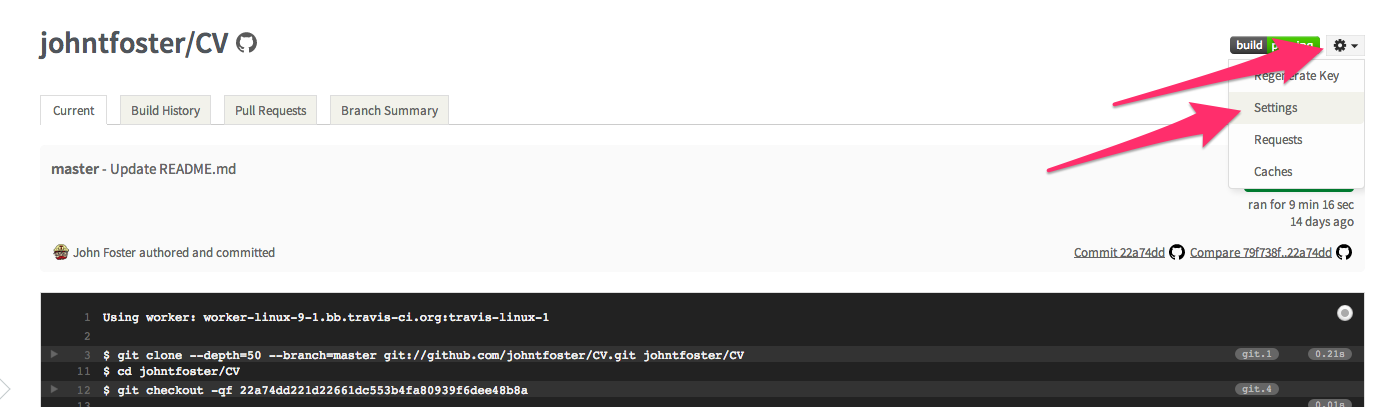
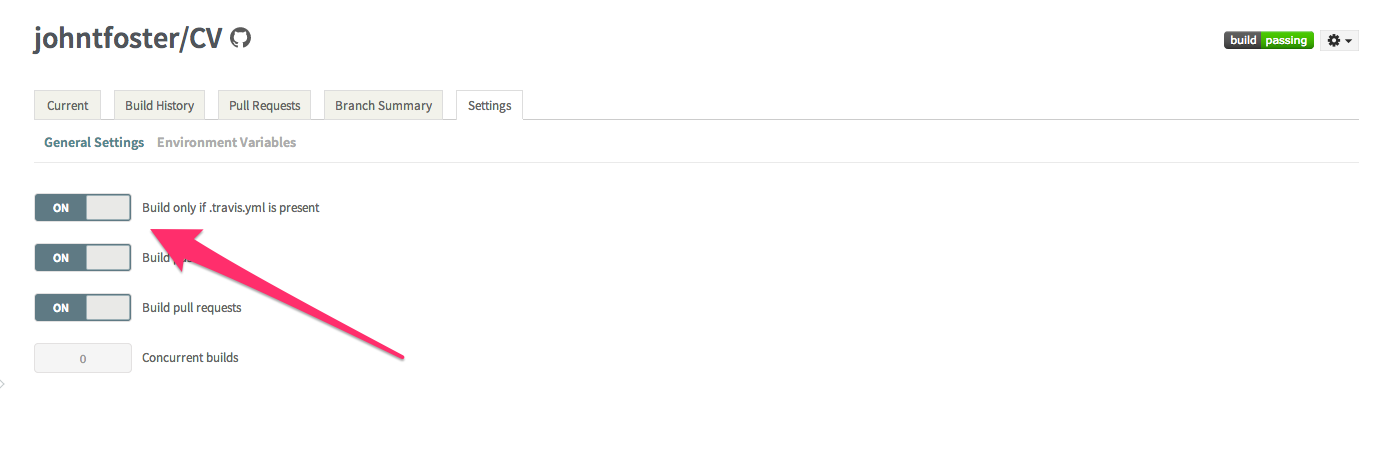
The environment variables can be set on the Travis setting page as shown
then click on the environment variables tab and select "Add a new variable"
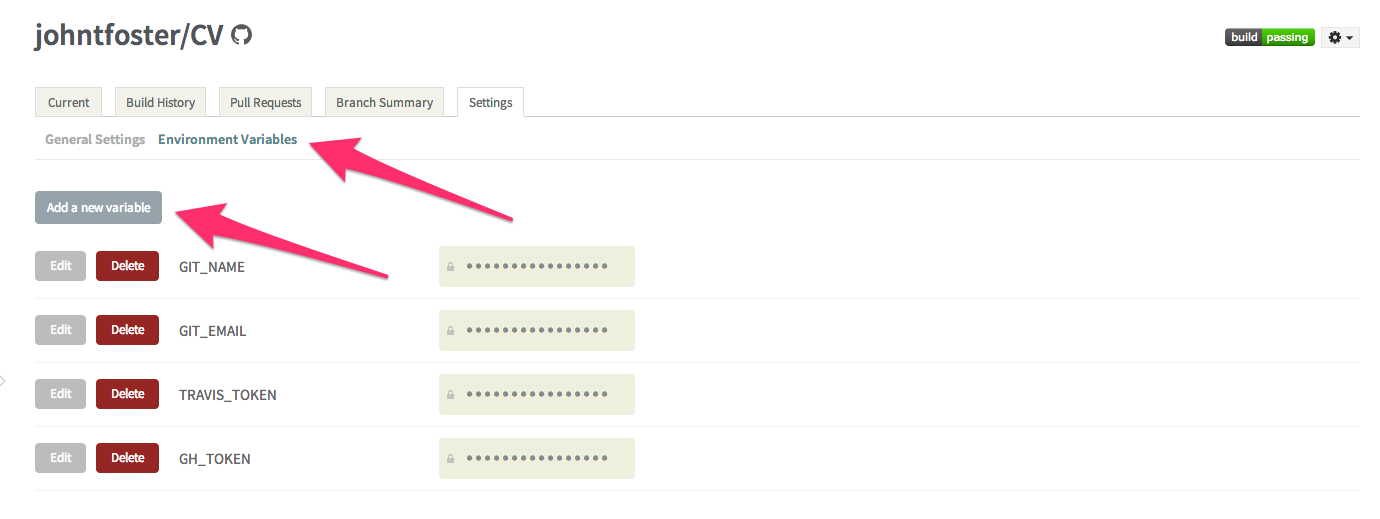
while on the settings page, it is also useful to select "Build only if .travis.yml is present" this will prevent Travis from automatically attempting to build on repository branches that do not have a .travis.yml file, as is the case with the travis-build branch we created earlier. These environment variables are stored encrypted on the Travis servers.
The other two environment variables, GH_TOKEN and TRAVIS_TOKEN are more critical as they allow the Travis the proper credentials to commit back to Github and to issue a new build of the website for which the CV will be included. The get a GitHub token, go to your GitHub settings page, click on Applications on the left-hand panel and then "Generate new token", give the token a name and copy or write down the token somewhere safely.
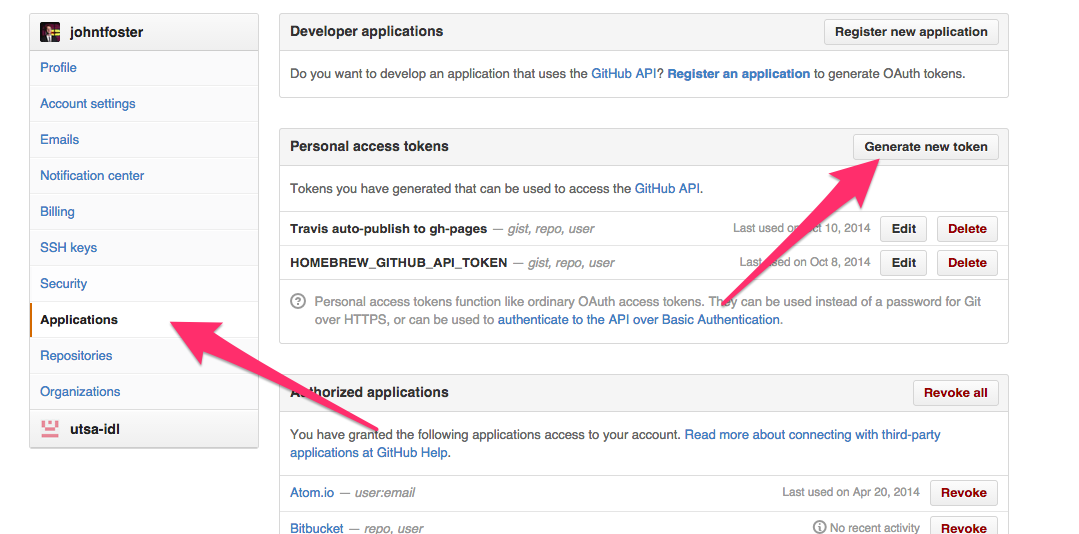
This will be the only time you can actually see the token so make sure you have it copied somewhere. You can use the same token form multiple Travis jobs, but you have to know what it is and cannot reveal it again later. Use this token to set the GH_TOKEN environment variable back on the Travis site. Finally, you can get a TRAVIS_TOKEN through the Ruby Travis command line interface. If you have Ruby installed you can install Travis like any Ruby gem with
gem install travis
Then you can find your Travis access token with
travis token
copy the result and add the final environment variable into your Travis settings page just like the others before.
Upon a successful build, Travis pushes new PDF and HTML versions to a branch on the CV repo
Now with the environment variables set, the last part of the .travis.yml file can be executed to publish the built PDF and HTML files to the travis-build branch.
This issues a git commit with a message that includes the current Travis build number via the default ${TRAVIS_BUILD_NUMBER} environment variable. The ${GH_TOKEN} environment variable establishes the ability to push back to origin, i.e. GitHub without an explicit login.
Travis then triggers a rebuild of the professional website which is stored in it's own repo
The trigger is what occurs in the last two lines of the .travis.yml file. First we have to install the Travis command line client on Travis via Ruby gem. We are ensured that Ruby is installed by specifying language: ruby in the first line of .travis.yml. Then we execute the trigger. The entry following the -r option specifies the GitHub repository to trigger a Travis rebuild on, in this case johnfoster-pge-utexas/johnfoster-pge-utexas.github.io.
This completes the process of automatically having Travis build the CV and publishing back to GitHub. The complete .travis.yml file is now shown
Because of the need to install all of the large LaTeX dependencies into the Travis Ubuntu image before compiling, this whole process takes about 10 minute on Travis, a little long to just compile a simple LaTeX file, but if one needs a speedy deployment the steps can always be completed manually. Hopefully, one day Travis will consider adding a LaTeX image to their pre-installed language images. This would likely cut down the compile time to only a minute or two at most.
Travis then rebuilds the professional website with Nikola and includes the new HTML CV as a page
As mentioned earlier, I recently moved to the static site generator Nikola. After many years using Wordpress, I got tired of unnecessary database configurations (unnecessary because I mostly just had static pages) and the inability to edit posts in plain text. After a little searching, and having a preference for a static blog site that was extendable through my favorite programming language Python, I narrowed it down to Pelican and Nikola. I experimented with each of them and decided on Nikola because I felt like the codebase was a little easier to understand in the case I would want to extend it in some way, and did not have the Sphinx dependence that Pelican has. There are several good tutorials on Nikola use, so I will not address this here; however, one nice feature of Nikola is that is has the ability to use the nascent pandoc as a document compiler. Pandoc's Markdown is a superset of standard markdown and is quite a bit more flexible than standard Markdown allowing you to mix standard Markdown, LaTeX math, and raw HTML markup. Nikola doesn't require pandoc, but I would like the ability to use it, so we first need to install it as a dependency. Pandoc is written in Haskell, so it would require several steps and a lengthy install, thankfully the guys at RStudio have a set of compiled binaries that will work when installed into Travis, these are what the first few lines of .travis.yml in the johnfoster-pge-utexas.github.io repository are doing.
Nikola can be installed via pip in Python. Because I also want to keep the option open to blog in IPython, there are also IPython and all the scientific Python stack dependencies that need to be installed. To install all of these dependencies we use a requirements.txt file.
Then we can build the website
In order to get the PDF and HTML versions of the CV that was built and posted earlier to show as a page in this website, I use a ReStructured Text format document which Nikola can compile, using the raw html directive
.. raw:: html
   :url: https://raw.githubusercontent.com/johntfoster/CV/travis-build/cv.html
which produces this page when compiled by Nikola.
The last part of the .travis.yml is very similar to what was described previously for the CV, only now we push to a branch gh-pages because we actually want GitHub to serve the website. Details on using GitHub pages can be found here. The entire .travis.yml file is shown below.
After this file is run successfully by Travis, the website will be served on GitHub. My site can be seen here. The entire process from pushing a change on the CV, to the professional website being completely rebuilt and updated usually takes around 10-15 minutes. Again, if there were ever a need to have an instant update, there is always the option to push the changes by hand. Please feel free to use any or all of the tips/code presented in your own workflow.
Comments
Comments powered by Disqus